The tale of PrintGuard: From dissertation to deployment
How PrintGuard evolved from a dissertation model to a barely functional pip package to a hub people run on their own printers.
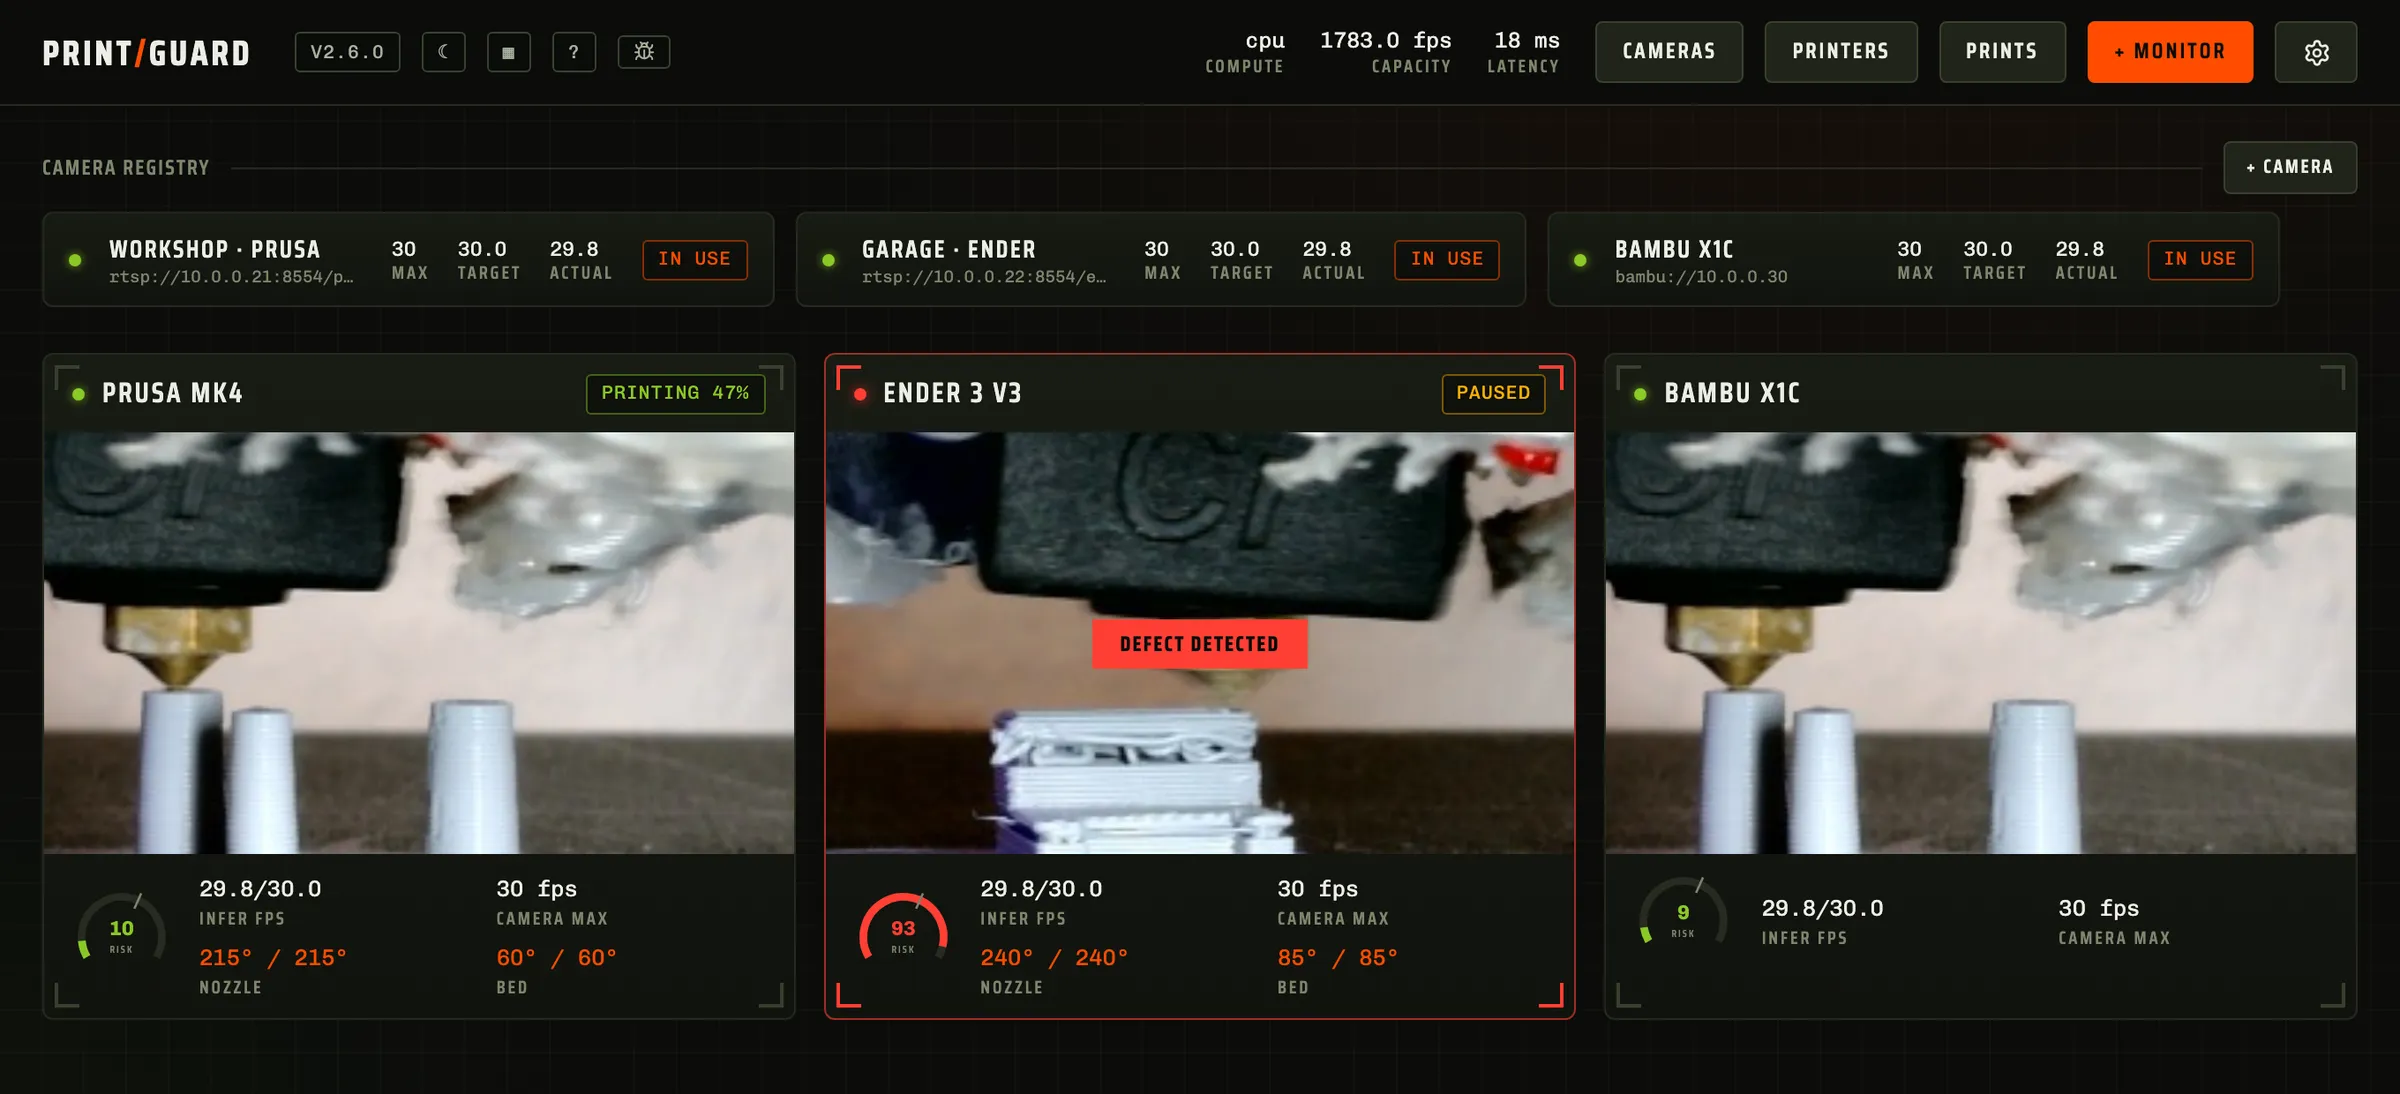
This is the tale of how PrintGuard went from a model in my dissertation to an app people run on their own printers. Along the way I learnt how to build something that's actually ready for other people to use, made (many) mistakes and learnt how to act on feedback from the community to make PrintGuard better for everyone. It's a long read, but I hope you enjoy it!
And so it begins: A bad printer and a dissertation
I own a really bad 3D printer. It's a Monoprice Mini Delta and whilst it has some useful features such as auto-levelling, it also has its many faults, which you would expect from a printer under a hundred quid. Prints would constantly be coming off the build plate, warping or stringing, wasting hours of my time and a whole bunch of my filament. So I went looking for something that could watch prints for me and found Obico, formerly known as 'Spaghetti Detective'. At the time I was a uni student, and Obico's detection service was protected behind a paywall running in their cloud. I didn't have that much spare money and also didn't feel comfortable sending my camera frames off to a third party to be checked. Hosting it myself wasn't much better since their open source server needs 4 GB of RAM and a decent GPU to operate on edge devices, making it unsuitable to deploy on cheap hardware I had lying around that could be left powered on while printing, such as Raspberry Pis. Obico could pause a print through their OctoPrint plugin, but their model was slow and only looked for spaghetti defects. I didn't need anything clever, I just wanted it to tell me when a print was failing so it could stop the printer and get sent a notification.
I was studying Computer Science at Newcastle University, specialising in machine learning, and still hadn't come up with a good idea for my dissertation which made this a perfect opportunity to apply what I had learned. The whole idea behind it was that fault detection should be something everyone with a 3D printer gets to have, not something you pay for. If you're a student like I was, you can't afford cloud subscriptions, so it had to run on cheap hardware you already own. My minimum target was a Raspberry Pi 4B.
The technical bit: The model, the data and the training
There weren't many public datasets of failing prints to use at the time and a lot of the ones I found on Roboflow and Kaggle were padded out with duplicates, the same photo saved again with slightly different colours, brightness or rotations. As I planned to perform my own transformations during training, the de-duplicated data left me with very few unique samples. To try and compensate for the lack of unique camera angles and positions, the random augmentations I performed on images such as rotations and flips helped mock different scenarios. Aiding in keeping the model lightweight, all training data was converted to greyscale which had the added benefit of instructing the model to learn shapes and textures rather than filament colours. I combined seven datasets in the end with the most restrictive being licensed under GPL 2.0, hence why the trained model uses the same licence.
The model itself is a ShuffleNetV2 encoder inside a prototypical network. ShuffleNetV2 was designed to run quickly on the kind of ARM chips a Raspberry Pi has. The prototypical network works by turning each image into an embedding. Then, by averaging the embeddings of a handful of good and failed examples, we create one "prototype" for each class (a mean embedding for both defective prints and safe prints). A new frame is classed by whichever prototype it's closest to. I expected fine-tuning the encoder on 3D print related images would help the encoder generalise better across the 3D printing domain, however this actually yielded the opposite result. The best model skipped this fine-tuning stage, instead starting from the standard ImageNet weights and training the whole network with a lower learning rate to prevent memorisation of the small dataset.
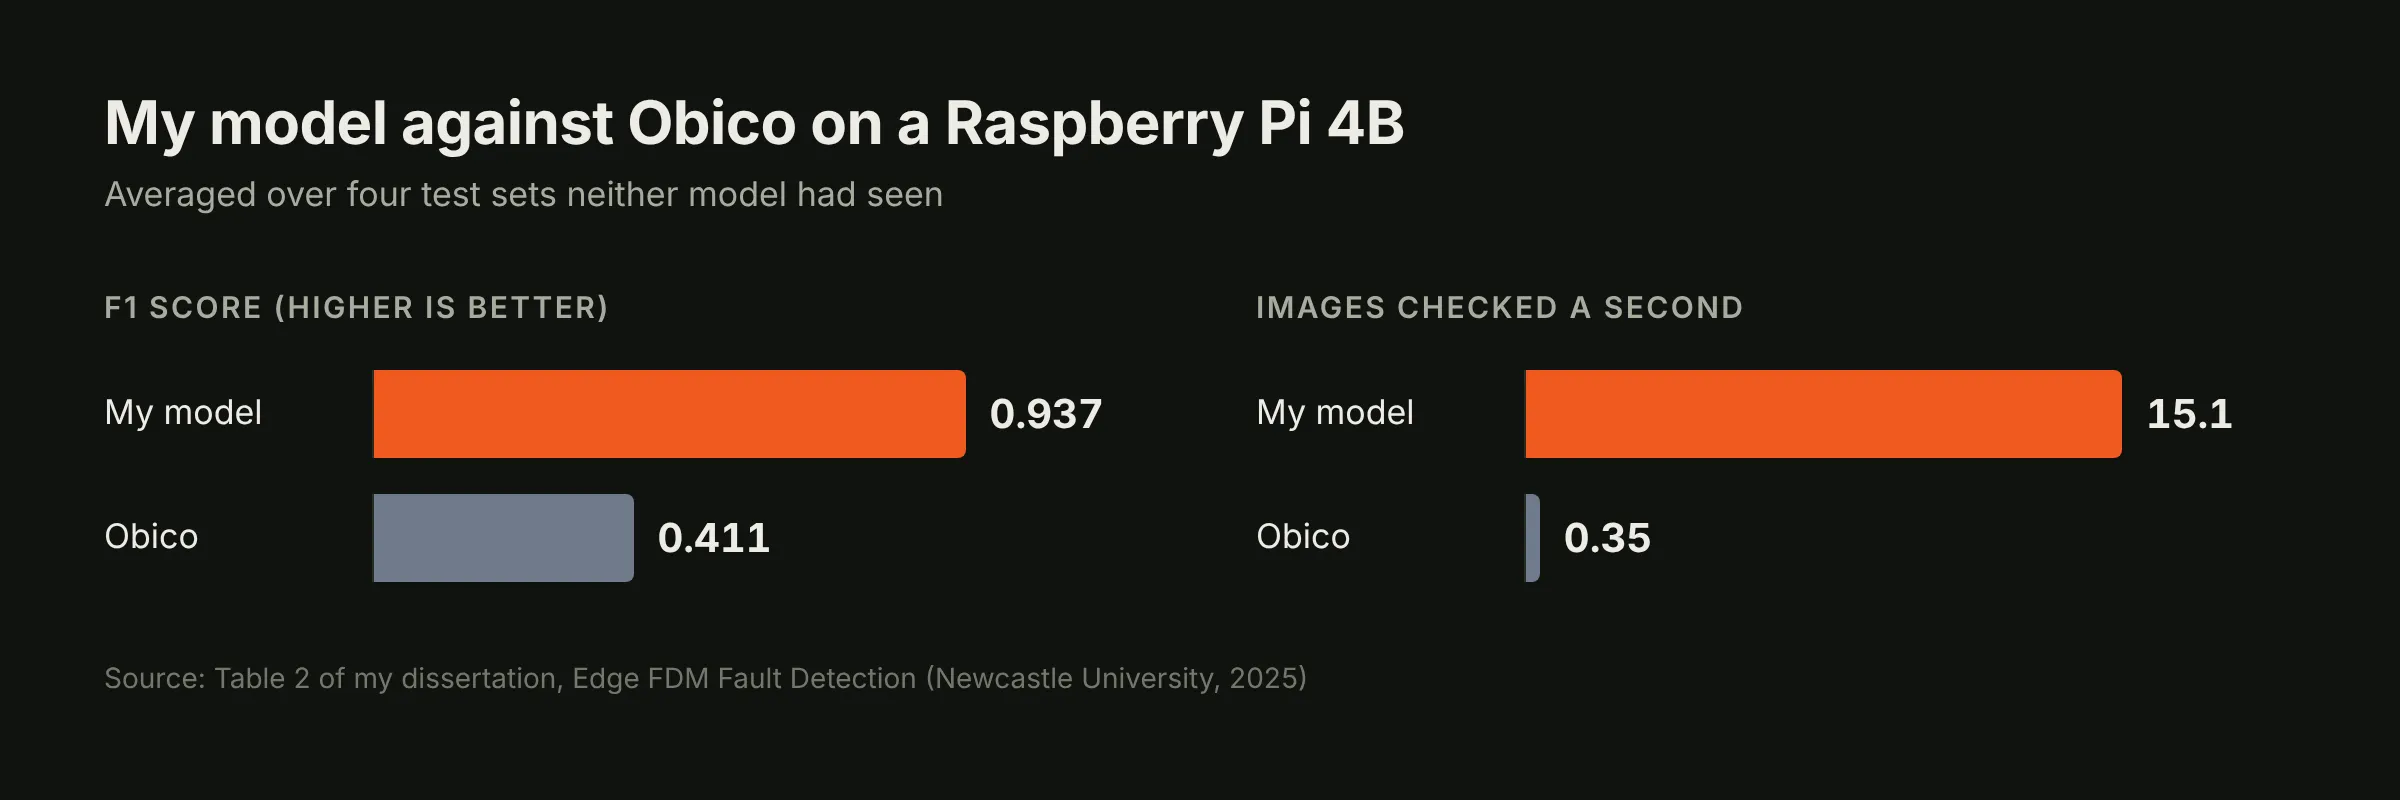
On a Raspberry Pi 4B it scored an F1 score (how precise the model is on average, a score closer to 1 is typically better) of 0.937 at 15.1 images a second. Obico's model, on the same four eval sets and Pi, scored 0.411 at 0.35 images a second, so mine was 43 times faster with more than double the F1. The model is a binary classifier, so it says failing or not failing, and it catches the faults that ruin a print, like spaghetti, prints coming off the bed and layers splitting, rather than just spaghetti. The dissertation contains the full details of the model, the research and reasoning behind decisions alongside the training process and results if you would like to read more.
The troubled pip package: Version one
After uni my goal was to turn the model into something people could actually use. My degree had taught me frameworks such as FastAPI so I wrapped a quick web interface round the model's PyTorch weights and made the web server a runnable pip package. You'd install it, run printguard and it would start a server you visited at localhost. In hindsight this is a terrible idea, but I was fresh out of uni and didn't know much about best deployment practices.
To put it bluntly, this version was a mess and barely functioned. My ideology was that most 3D print hobbyists might not have much technical knowledge. As the main focus of PrintGuard was to watch your prints, notify you when something went wrong and allow you to watch prints remotely I had assumed (for some unbeknownst reason) that it was essential to make the process of exposing and securing the app as easy as possible without needing any technical experience.
From past projects I had worked on I knew Ngrok and Cloudflare Tunnels were a great way to expose a local service to the internet without port forwarding however I had thought at the time that their installation processes may be too complex to follow, requiring users to interface with the terminal. I then went down a rabbit hole attempting to streamline their setups and installations via button clicks in the PrintGuard UI, which never ended up working.
I thought I was making it easy but I actually made it more complicated which the GitHub issues raised by users show. People got stuck in the setup loop, couldn't set up a tunnel, couldn't save the push notification keys, couldn't import a certificate and asked to use a tunnel they already had.
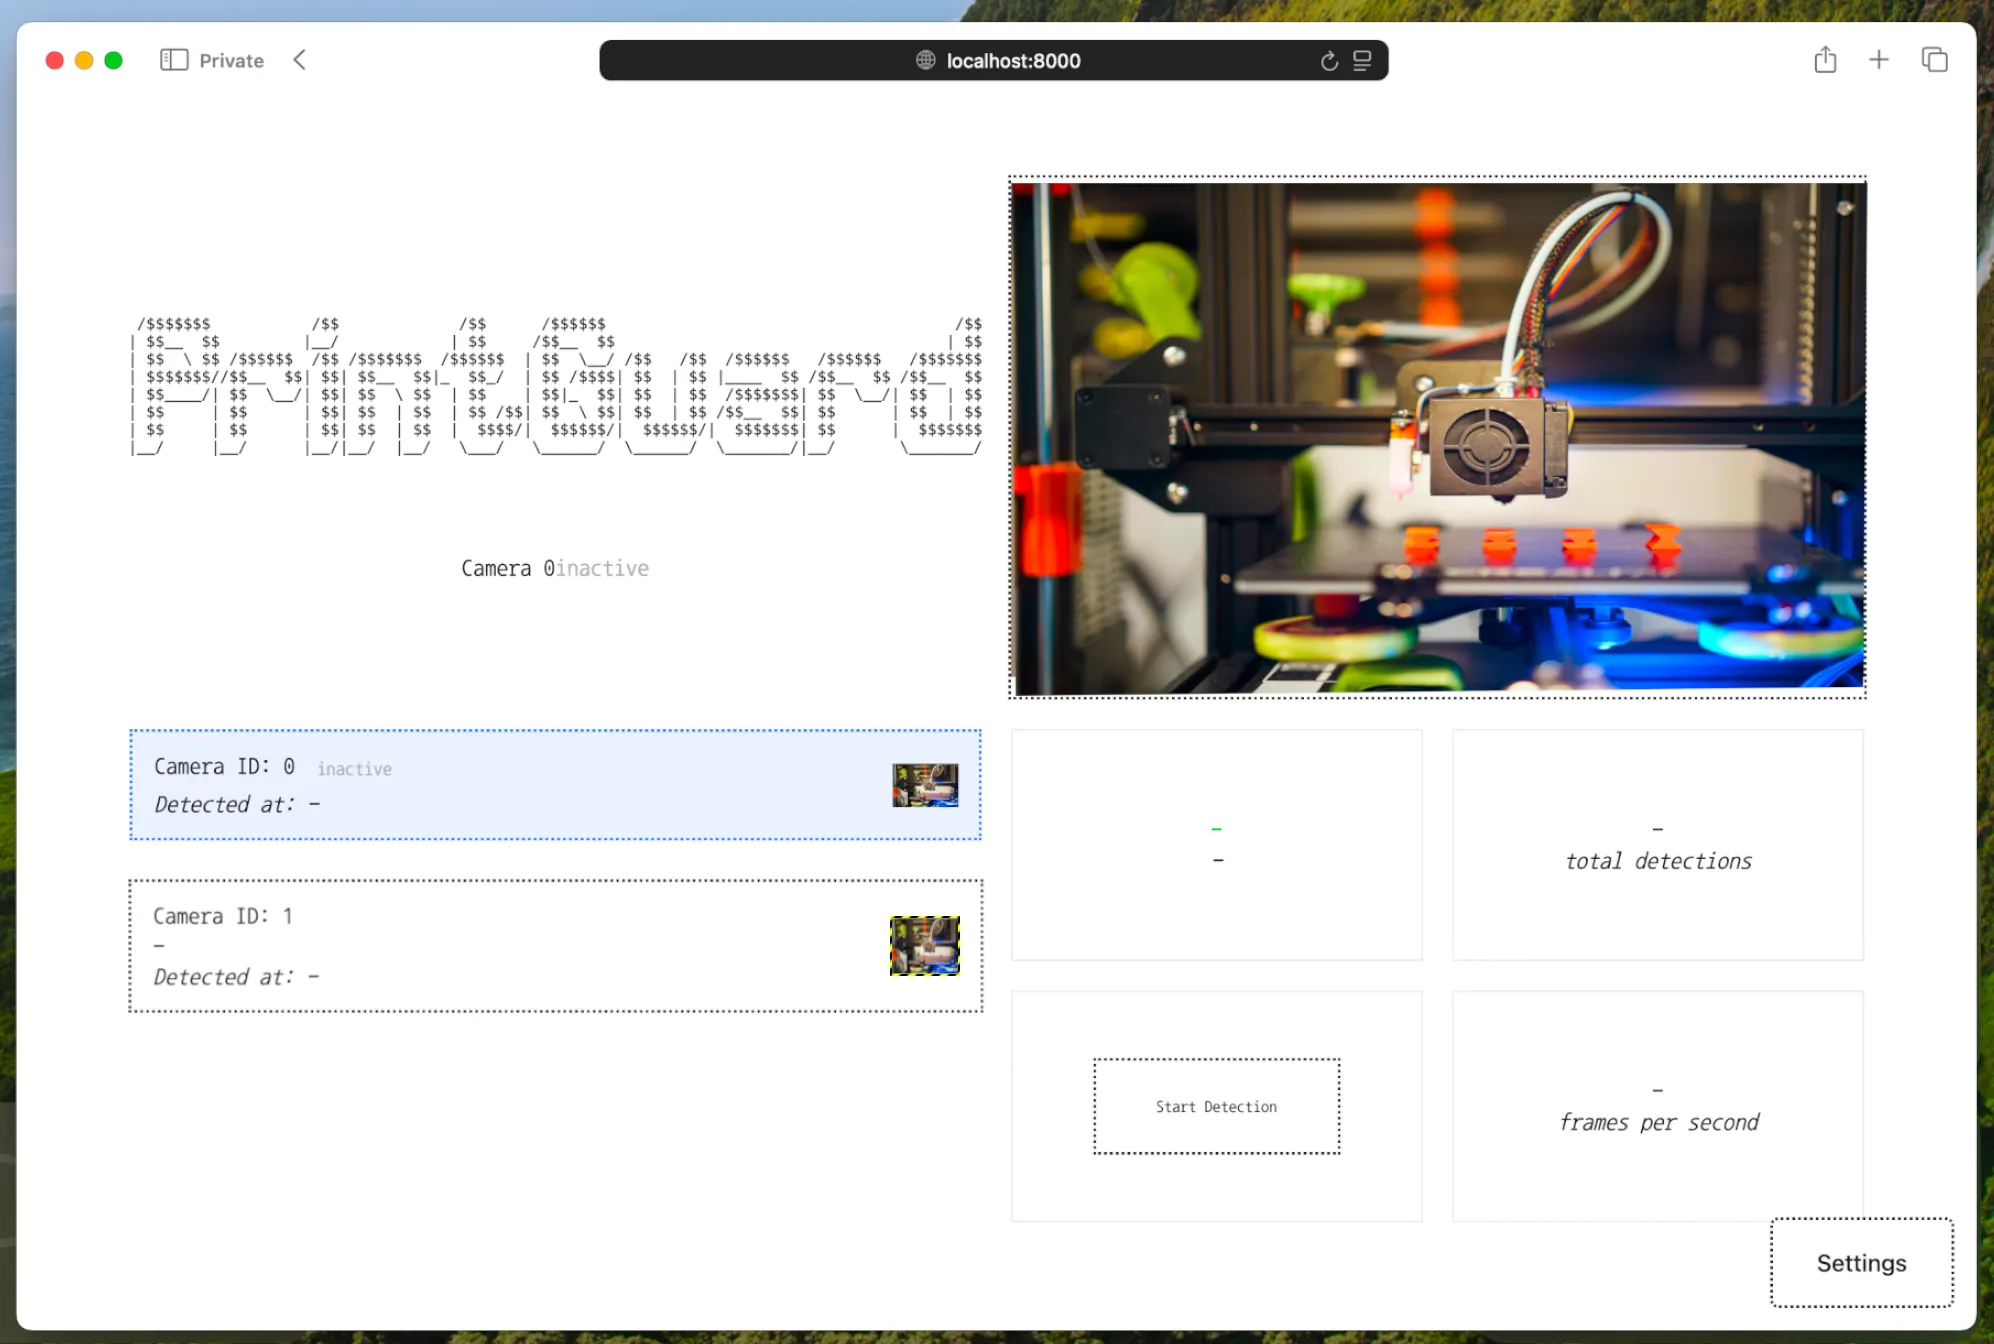
On top of all of this, there were still many other problems. The live camera views sent every frame as a full JPEG which used a lot of bandwidth and pushed up my Cloudflare bill when I was hosting it myself. It only talked to OctoPrint and the only notification channel I had developed was via web push. This desperate attempt of a monitoring system still managed to garner over 100 stars on GitHub, but I knew it wasn't good enough and I didn't have the time to fix it.
In September 2025 I started my first job as a Software engineer (in part thanks to this project) which unfortunately left me with less time to work on PrintGuard. The broken project sat dormant with issues piling up and members of the community pleading for it to not go abandoned. That Christmas I had a bit of time off of work and decided to look at PrintGuard again. Not wanting this project to die, I started prototyping a new web interface on a public branch however I didn't have the time to commit to it properly, leaving the project dormant once more.
Starting again: Version two
In May 2026 I decided to part ways with my software engineering job which gave me ample time to reinvest in PrintGuard. I had gained a lot of industry experience over that year, learning the importance of testing, deployability and maintainability which I was eager to apply. I knew that for PrintGuard to be successful it was going to need a structured development process, clear CI/CD pipeline and well planned triaging system so that the community can better contribute to the project and track the progress of their raised issues.
One problem was that, while my research claims my model performs better than Obico's, there was no reason for people to believe the claims without seeing results for themselves. I had learnt that consumers are far less likely to test something if there's too much friction (i.e. having to install and set up something) so came up with the idea of allowing users to infer the model in their browser without downloading anything. Converting the model using LiteRT (Google's runtime for on-device models) allowed it to be inferred using LiteRT.js in the browser. This enabled me to create a demo site dubbed 'local mode' where you could visit the website, connect your webcam and infer the model locally from your tab, testing the model's performance without having to install anything.
I wanted version two to be simple, modular and monolithic.
The monolithic part came from how we now have two modes, one running locally in your browser tab and another that is downloadable and deployable (aptly dubbed 'hub' mode). Writing separate code for both the hub and local mode would have led to similar functionality being implemented for both versions which could drift apart with changes and be impossible to maintain. To mitigate this I came up with a design where core functionality is agnostically written once in the 'engine' and platform specific 'contracts' build the bridges between the engine and the environment it's running in (i.e. how a webcam is passed to the engine in local mode vs a camera stream in hub mode).
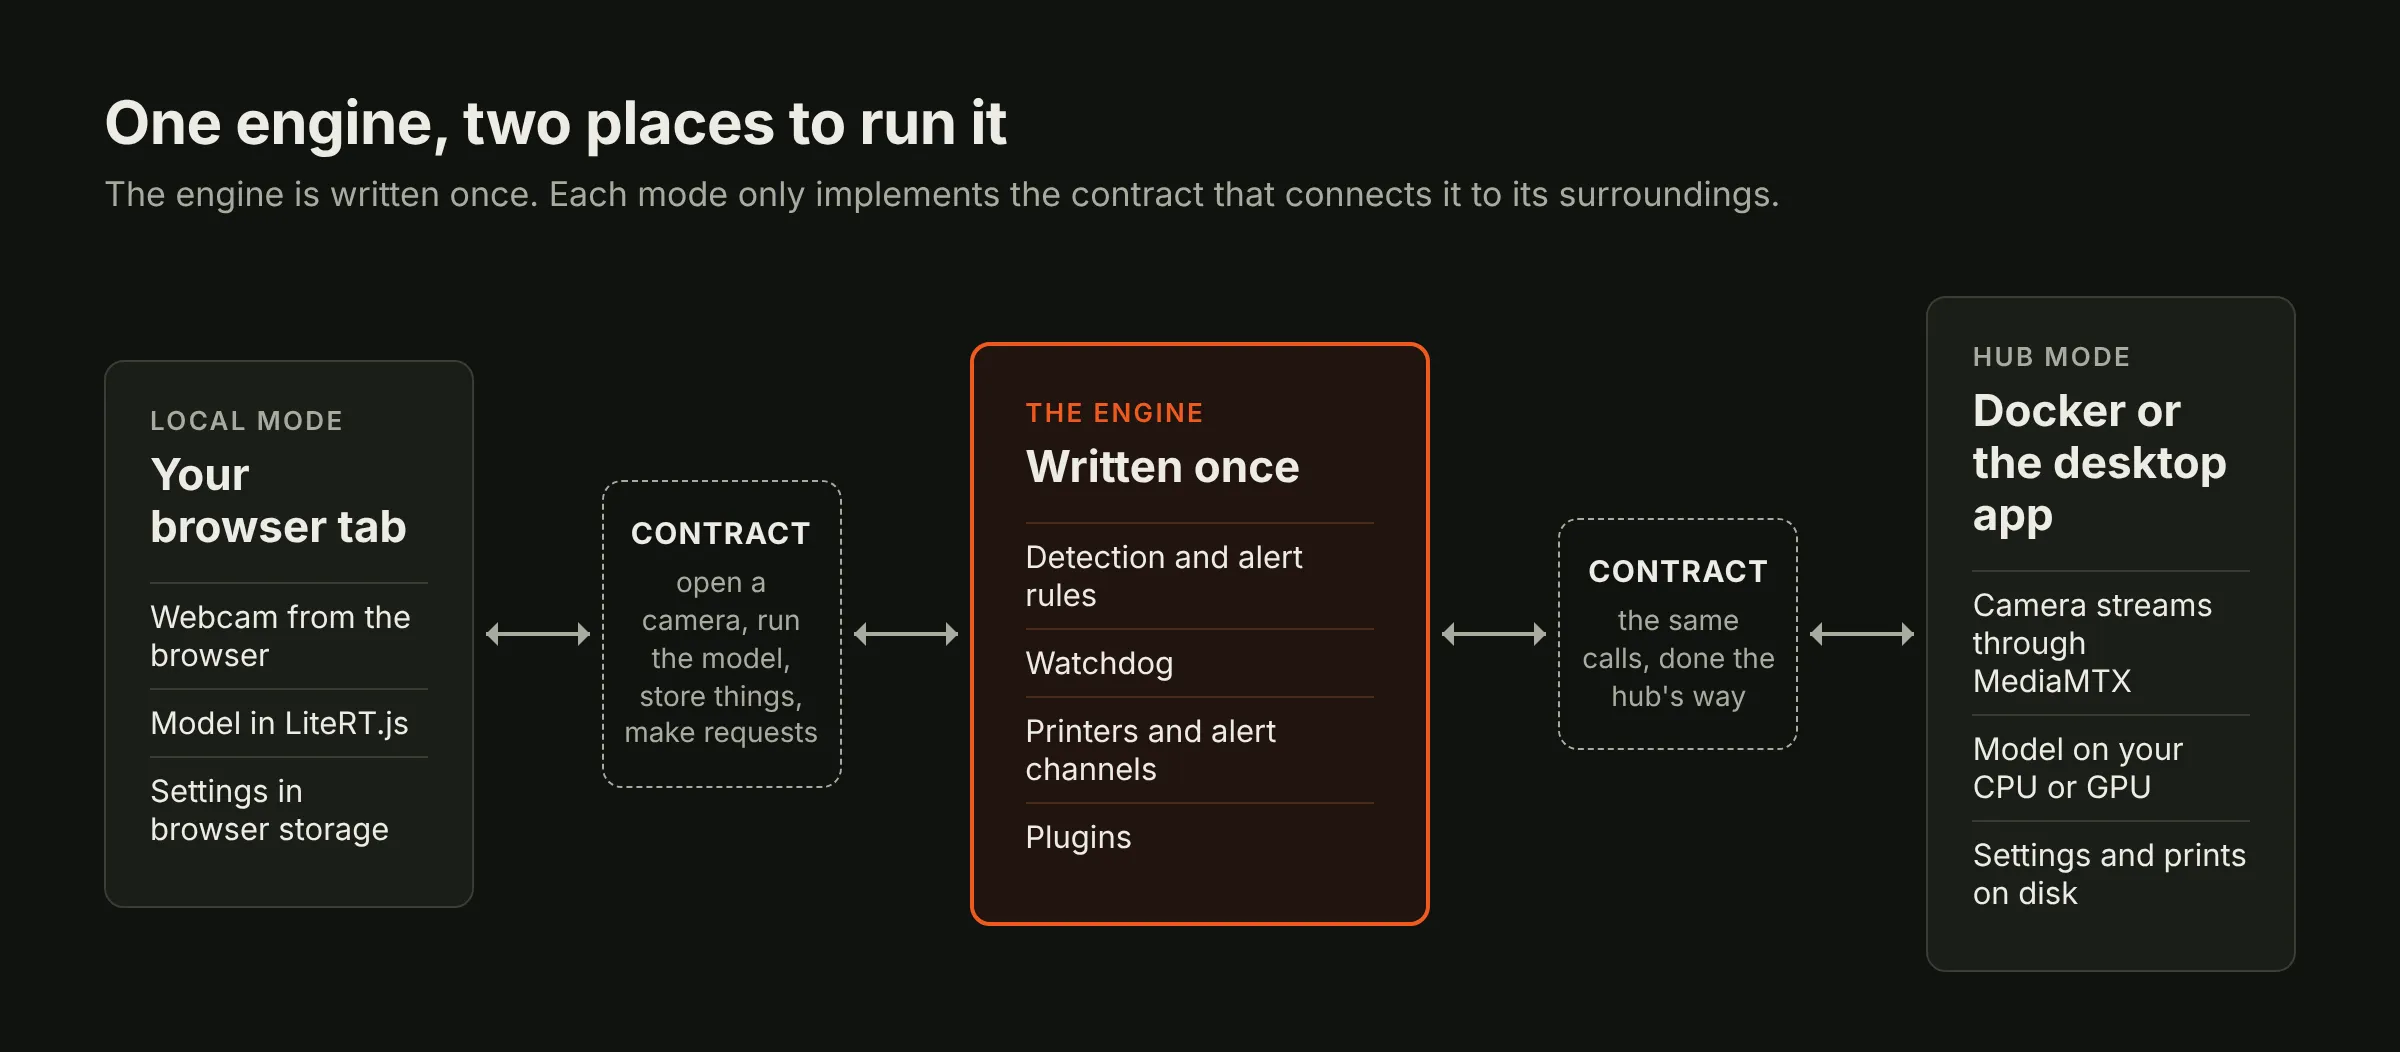
The modular part is derived from the idea where a feature has many different implementations, such as multiple printer integrations (OctoPrint, Klipper, Bambu Lab, ...) or different alert channels (Discord, Ntfy, Telegram, ...). Most of my prior studies focused on object-oriented programming all throughout college and uni which made me quite keen in the philosophy behind inheritance. This is why, for example, I decided that every printer service should be a small class that's derived from the same base, reports the same states (printing, paused, idle and so on) and takes the same actions (pause, resume and cancel).
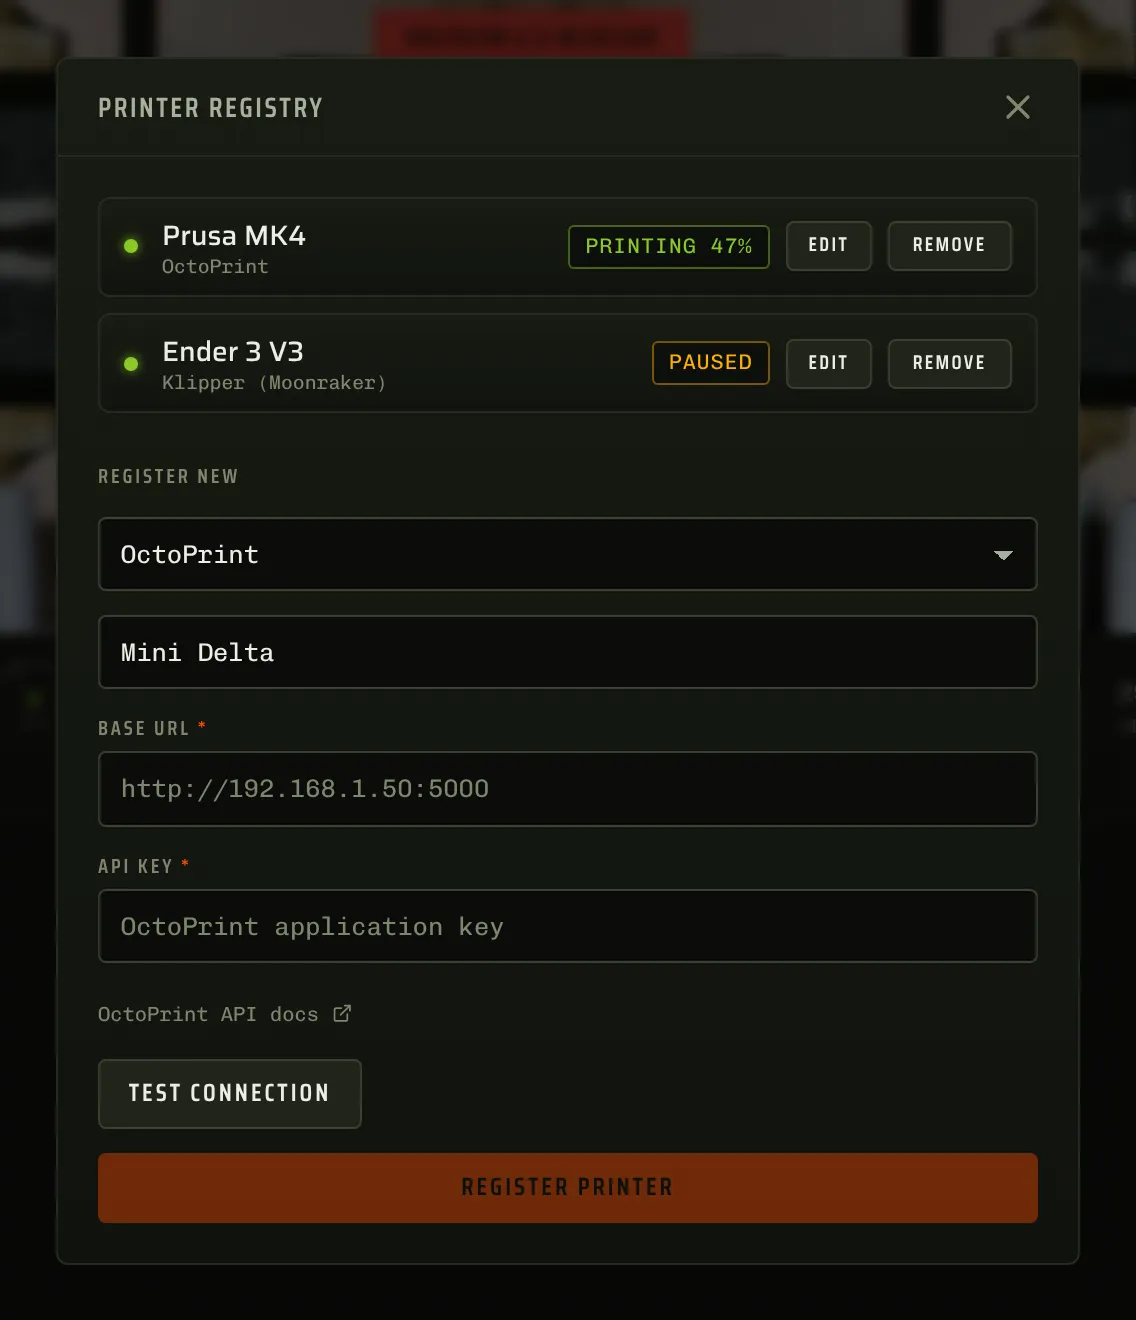
Differing alert channels and printers require different information during setup, whether that's printer addresses or API keys for notification channels. To incentivise more developers to contribute to PrintGuard, I wanted to streamline the process of adding new providers without having to contribute new UI changes as this could be a barrier to entry for some developers and risk breaking the dashboard, reducing consistency and increasing the maintenance burden. Following the modular design philosophy, a new provider only needs to define a simple schema (such as the example below) and the dashboard will automatically present the fields, preserving the styling and layout of the rest of the site.
schema = {
    "type": "object",
    "properties": {
        "base_url": {
            "type": "string",
            "format": "uri",
            "title": "Base URL",
            "placeholder": "http://192.168.1.50:5000",
        },
        "api_key": {"type": "string", "title": "API key", "secret": True, "placeholder": "OctoPrint application key"},
    },
    "required": ["base_url", "api_key"],
}
As PrintGuard is relied on for the safety of prints, reliability was key for version 2. At my last job I learned the difference between failing gracefully and failing safely, and PrintGuard must therefore do the latter. If a camera drops or the printer connection goes, the detection itself becomes pointless. You also need to know if your print isn't being watched which is why everything is guarded behind a new watchdog system. This watchdog constantly runs independently from the main system where, among many other safety measures, if a camera is offline for 12 seconds, a feed freezes for 30 seconds or the printer stops answering, you get a warning on the dashboard and via your alert channels, alongside being told when anything recovers. A pause is tried three times and a failure is announced, never swallowed.
I also abstracted everything from version one that wasn't PrintGuard's job. Tunnels and logins aren't essential for this project, so the app stopped trying to set them up via the setup flow, instead instructing users in the docs on how to protect their deployments using Tailscale, Cloudflare Access or auth proxies independently from the main application. Writing my own video multiplexer was a silly idea too, which led to the use of MediaMTX, a somewhat lightweight MIT-licensed media server that takes camera streams in almost any format and serves each one to as many viewers as needed. Detection and the live view share one connection to the camera, and the dashboard plays H.264 video instead of an expensive stream of JPEGs.
Version 2.0.0 came out on the 15th of June 2026 which was met with overwhelmingly positive feedback from the community.
The art of open source: Community feedback and support
Reddit and GitHub gave me a lot of well appreciated feedback very quickly. As the userbase grew, more and more people were willing to help contribute to the project, and I had an influx of people testing PrintGuard and requesting features I hadn't yet thought of. Bambu Lab printers are a great example of this where one Reddit user asked for Bambu support so, using community documentation for the printer's local MQTT connection I was able to add experimental support for these printers quickly. Having a bustling community was a lifesaver when it came to rapid development as users were constantly willing to test these features and provide feedback so they could be refined and ready for release in a matter of days instead of weeks.
The best example is a Crowsnest camera issue from five days after launch. A Klipper user's camera gave no frames. I asked for their Moonraker webcam list, which showed two bugs, one with WebRTC addresses and one where relative camera paths pointed at the wrong port, and both were fixed in the next patch version. It still didn't work, so I walked them through a Python test inside the container that proved the camera was fine and the separate MediaMTX container was missing. It turns out this user was installing PrintGuard via Unraid, a paid home server OS that combines a flexible NAS with an easy web UI for running Docker containers and VMs. Installing via Unraid meant only the PrintGuard container got installed, leaving out MediaMTX. This reminded me how important it is to reduce friction during setup, without overcomplicating it like I did in version one. To fix this I decided to bundle MediaMTX into the PrintGuard image (which could fortunately be done due to the permissive MIT licence MediaMTX employs) alongside providing a one-click Unraid deployment template.
Version 2.1 focused more on developer support, adding a REST API and MCP server so people could build their own apps and agents on top of PrintGuard. I had been experimenting with agents for a while up to this point and wanted to make it easy for other people to do the same. Following the same modular and monolithic design principles, I found a library called FastMCP which autonomously adapts FastAPI endpoints for the MCP protocol, making this implementation seamless without having to write any extra code. As PrintGuard no longer shipped its own auth system, it was important to ensure that the API and MCP could be secured, especially knowing that unauthorised access would allow attackers to see into webcams and potentially meddle with 3D printers.
At the time I had my own instance of PrintGuard deployed behind a Cloudflare Tunnel using Access for auth which helped me realise that some proxies, such as Cloudflare, did not offer any way to authenticate the API. This led to the implementation of a scoped token-based access system for the REST API and MCP server where tokens could be generated with differing levels of access, such as read-only, control (for pausing/resuming prints) and manage (for adding/removing printers and cameras). This allowed users to have fine-grained control over who could access their PrintGuard instances and in the case of agents, restrict their access to only the functionality they need.
Is something bugging you?: Logging, bug reports and triaging
I envisioned PrintGuard being used by many people which would inevitably lead to a variety of bugs being found. Knowing that I was targeting a typically non-technically savvy audience that may not be willing to delve into logs to find the cause of a problem, I wanted to make it easy for users to report bugs and for me to triage. At the core of PrintGuard is a logging system that records all events, errors and warnings. Nothing is missed and all logs are timestamped and stored. These logs however have the potential to contain sensitive information such as printer passwords, alert channel keys and API tokens, so it was essential to redact these secrets, which is accomplished by searching the logs for known secrets on the hub and replacing them when found.
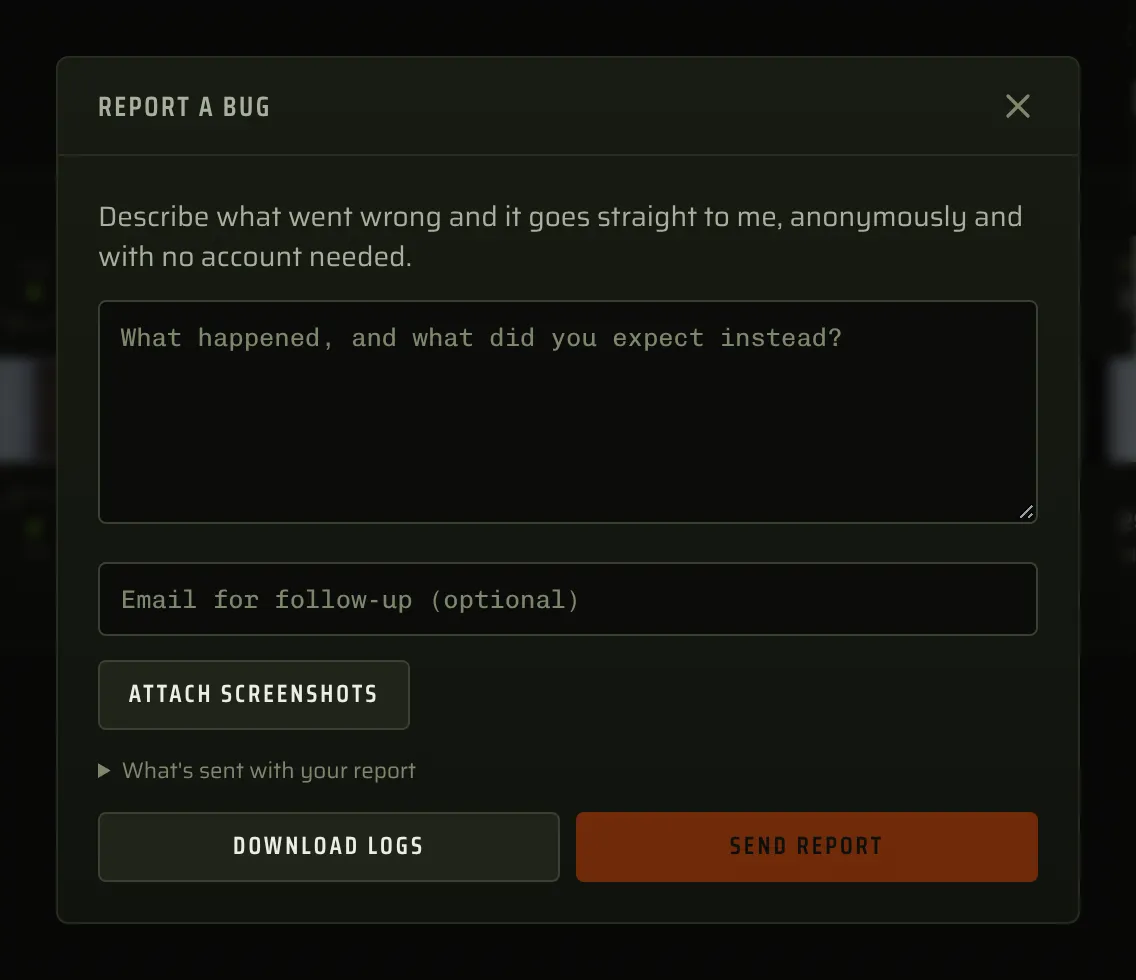
I still needed a way to receive logs from users. As PrintGuard is hosted on GitHub, the standard way I encouraged users to report bugs was to open an issue in the repo's tracker, so in the UI of PrintGuard I added a button which downloads the compressed redacted logs which can then be attached to an issue. This flow felt a bit clunky, adding unnecessary friction where users would need a GitHub account to report a bug. I eventually discovered Sentry, a service with a very generous free tier, enabling anonymous bug reports and error tracking. I integrated Sentry into PrintGuard so that when a user encounters an error, they can simply click the bug reporting button, describe the issue they faced and with a single click the redacted logs and error report are sent. This removes the potential for bugs to go unreported and allows me to triage and fix issues quickly, improving the overall stability of PrintGuard.
Issues reported on GitHub go through a triaging process, where incoming reports are automatically labelled as needing triage by a GitHub action. After I review the issue, I then label it with appropriate tags such as its type (bug, feature request, ...), area of the codebase it affects, priority and give it a status. When I'm working on a fix, I label it as 'in progress', when it's ready for testing (pre-release) its labelled as 'built' and after merging the fix into main, a GitHub action automatically re-labels the issue as 'completed', waiting 30 days for the reporter to confirm the issue is resolved and close the issue themselves, before it is automatically closed. This process allows me to keep track of the issues raised by the community and ensure that they are addressed in a timely manner, improving the overall quality of PrintGuard.
The good, the bad and the accessibility: Improving the user experience
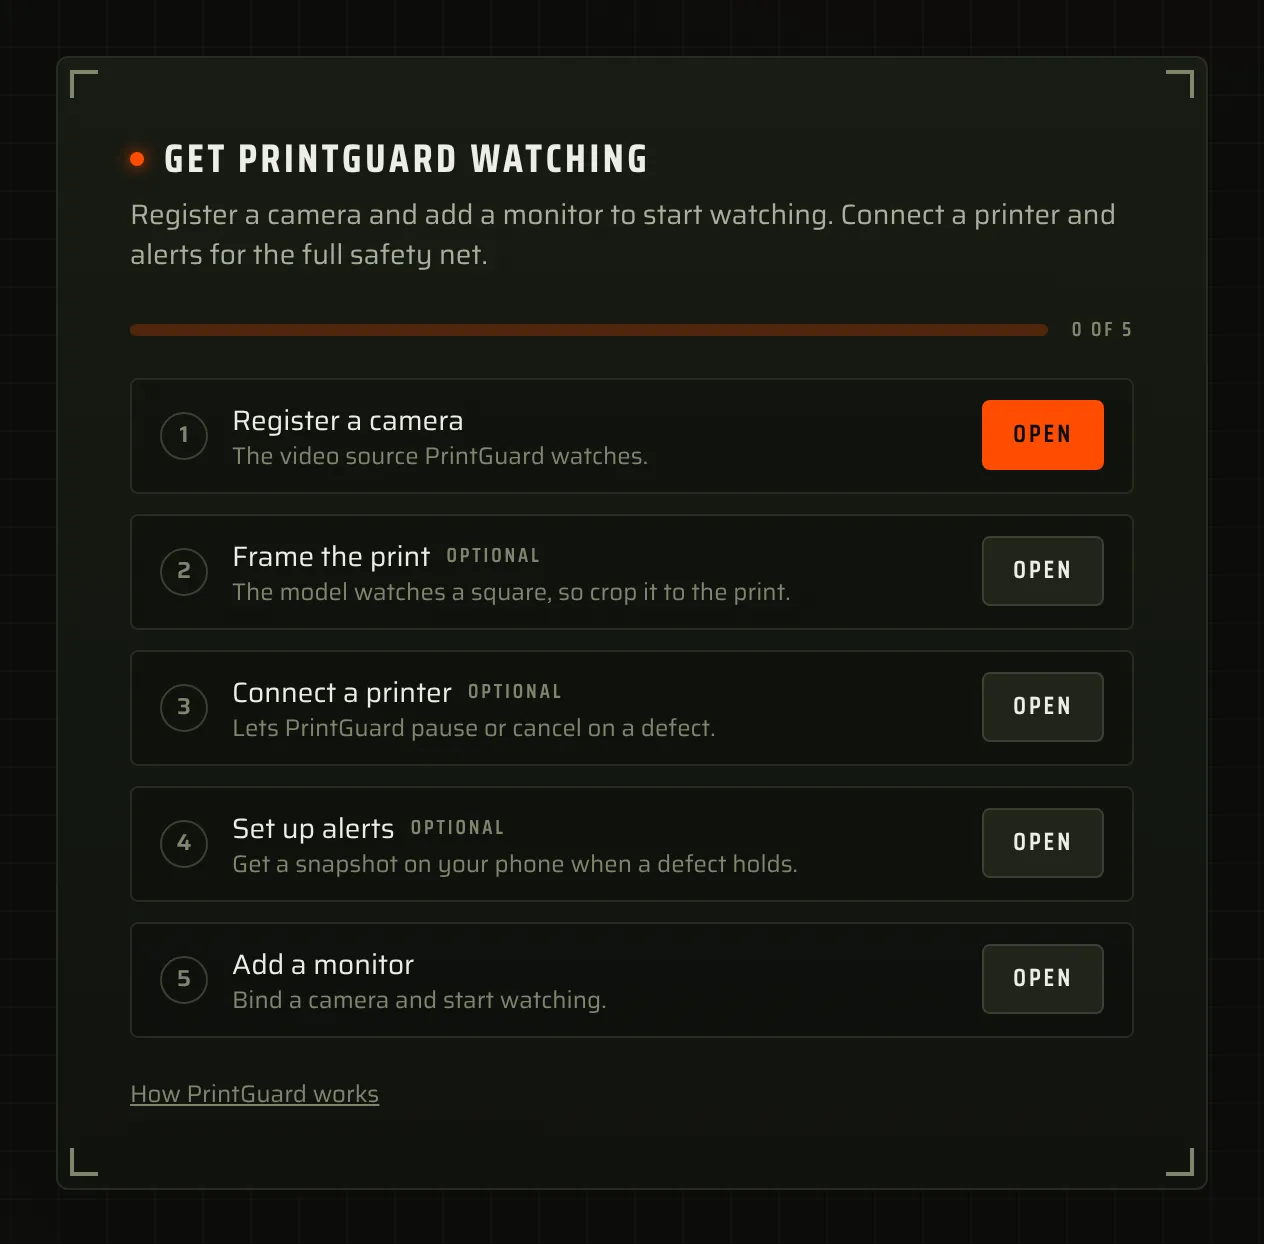
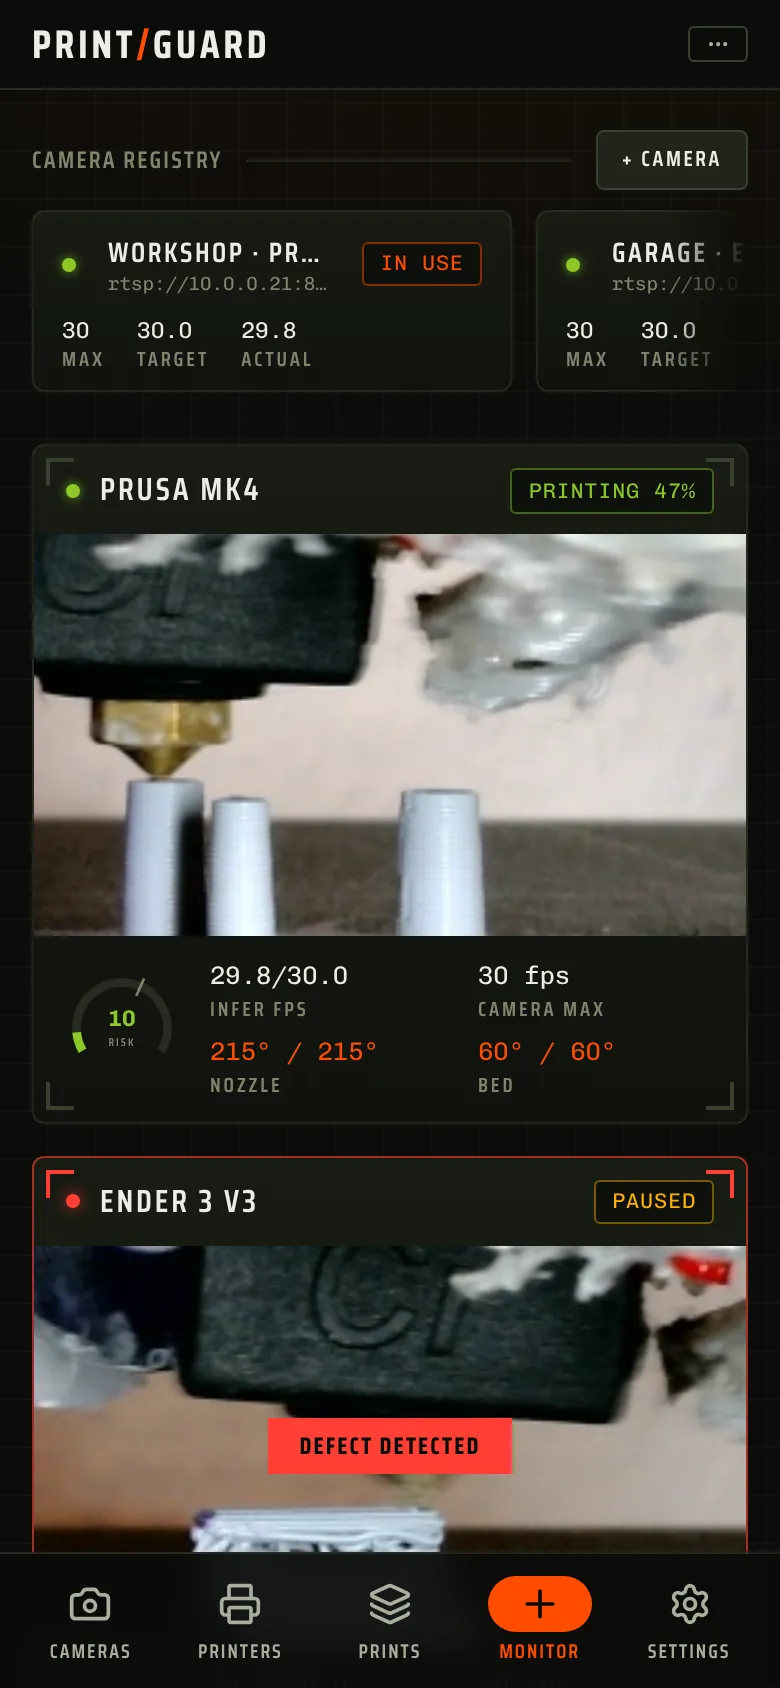
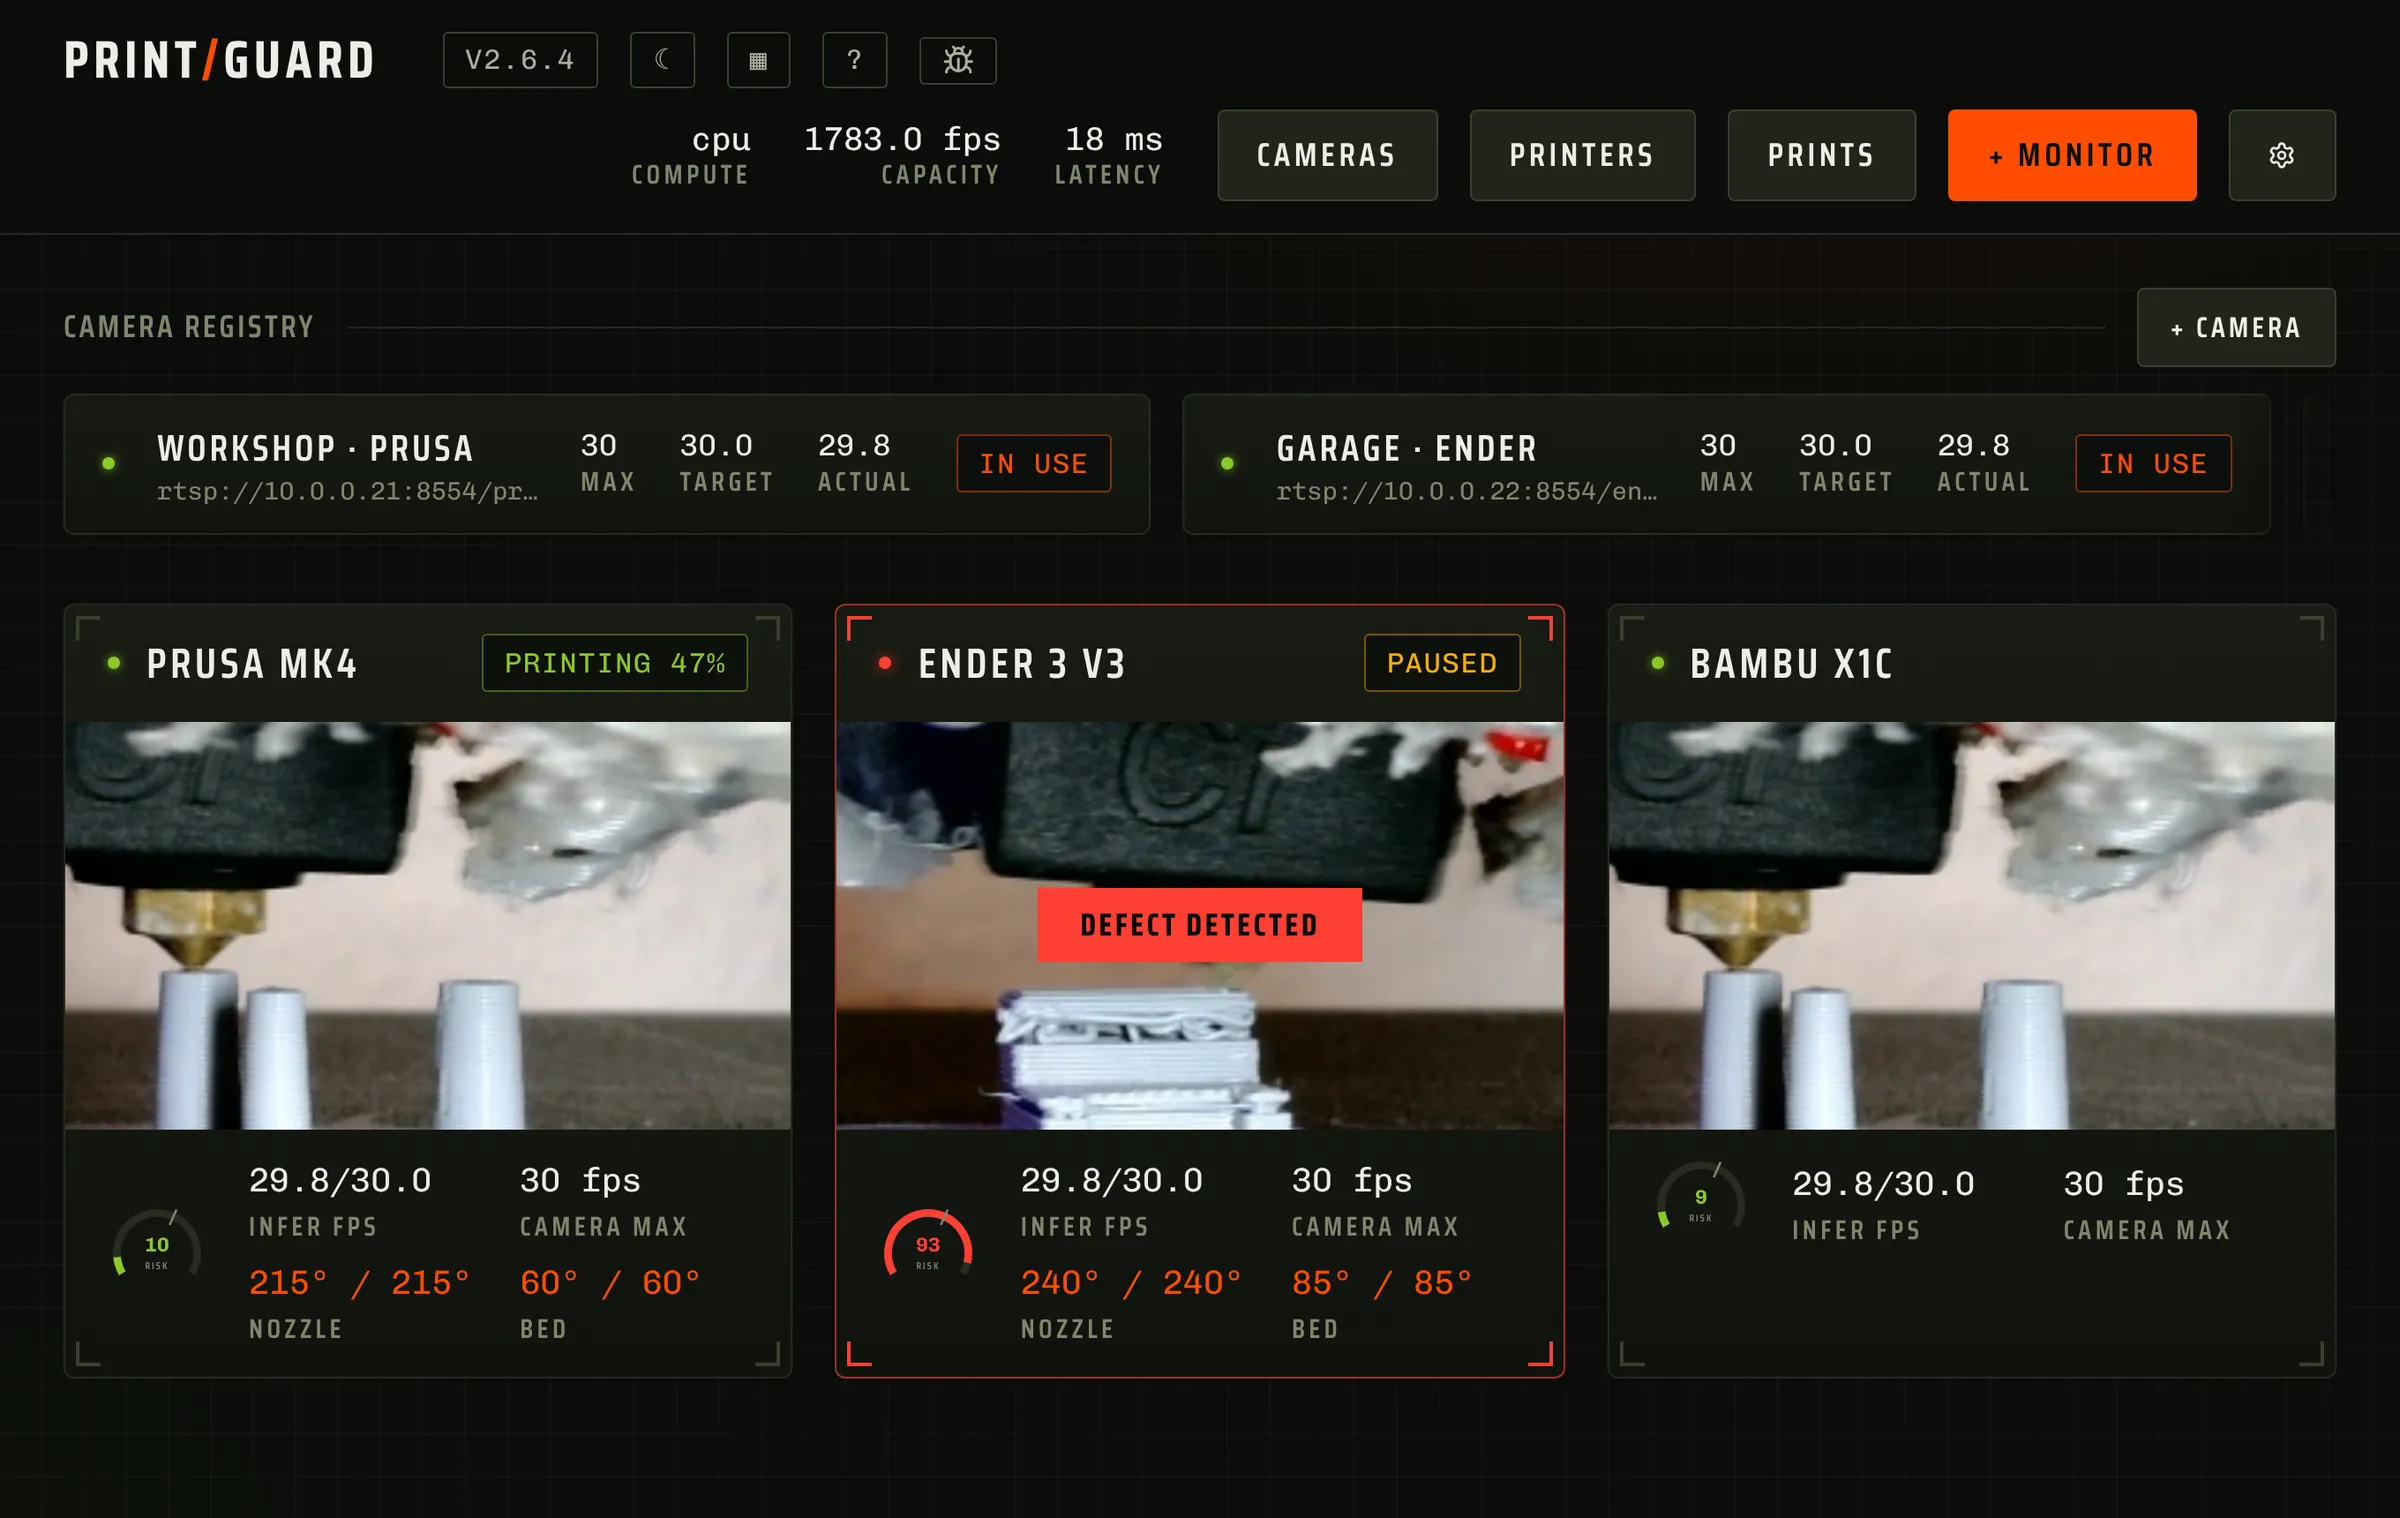
I noticed that while PrintGuard was functional, it wasn't intuitive enough for new users without them reading my long, detailed docs. I wanted to make it easier to get started with PrintGuard, which led my focus on improving the UX for version 2.2. Some simple changes were made to reduce friction with first time users, where a setup guide was added to the dashboard showcasing PrintGuard's key features and what they do. This acts as more of a 'what's in the box' guide rather than a full tutorial, with the idea of trying to hook the user's engagement and get them to explore the dashboard themselves. After the initial guide I realised that users would be left with a blank deployment if it was their first time using PrintGuard, which could be daunting and confusing. There were no hints into what to do next, which could have led to users giving up at the first hurdle. As a counter, if your deployment is empty the dash now shows a helpful checklist of things to do to get started with quick links to the relevant pages. This includes adding a camera, printer and alert channel alongside setting up your first monitor. As an added measure, a help chip was also added to the dash to bring up a quick guide on how to use most features in PrintGuard, useful for users that may already have a deployment but need a refresher in certain parts.
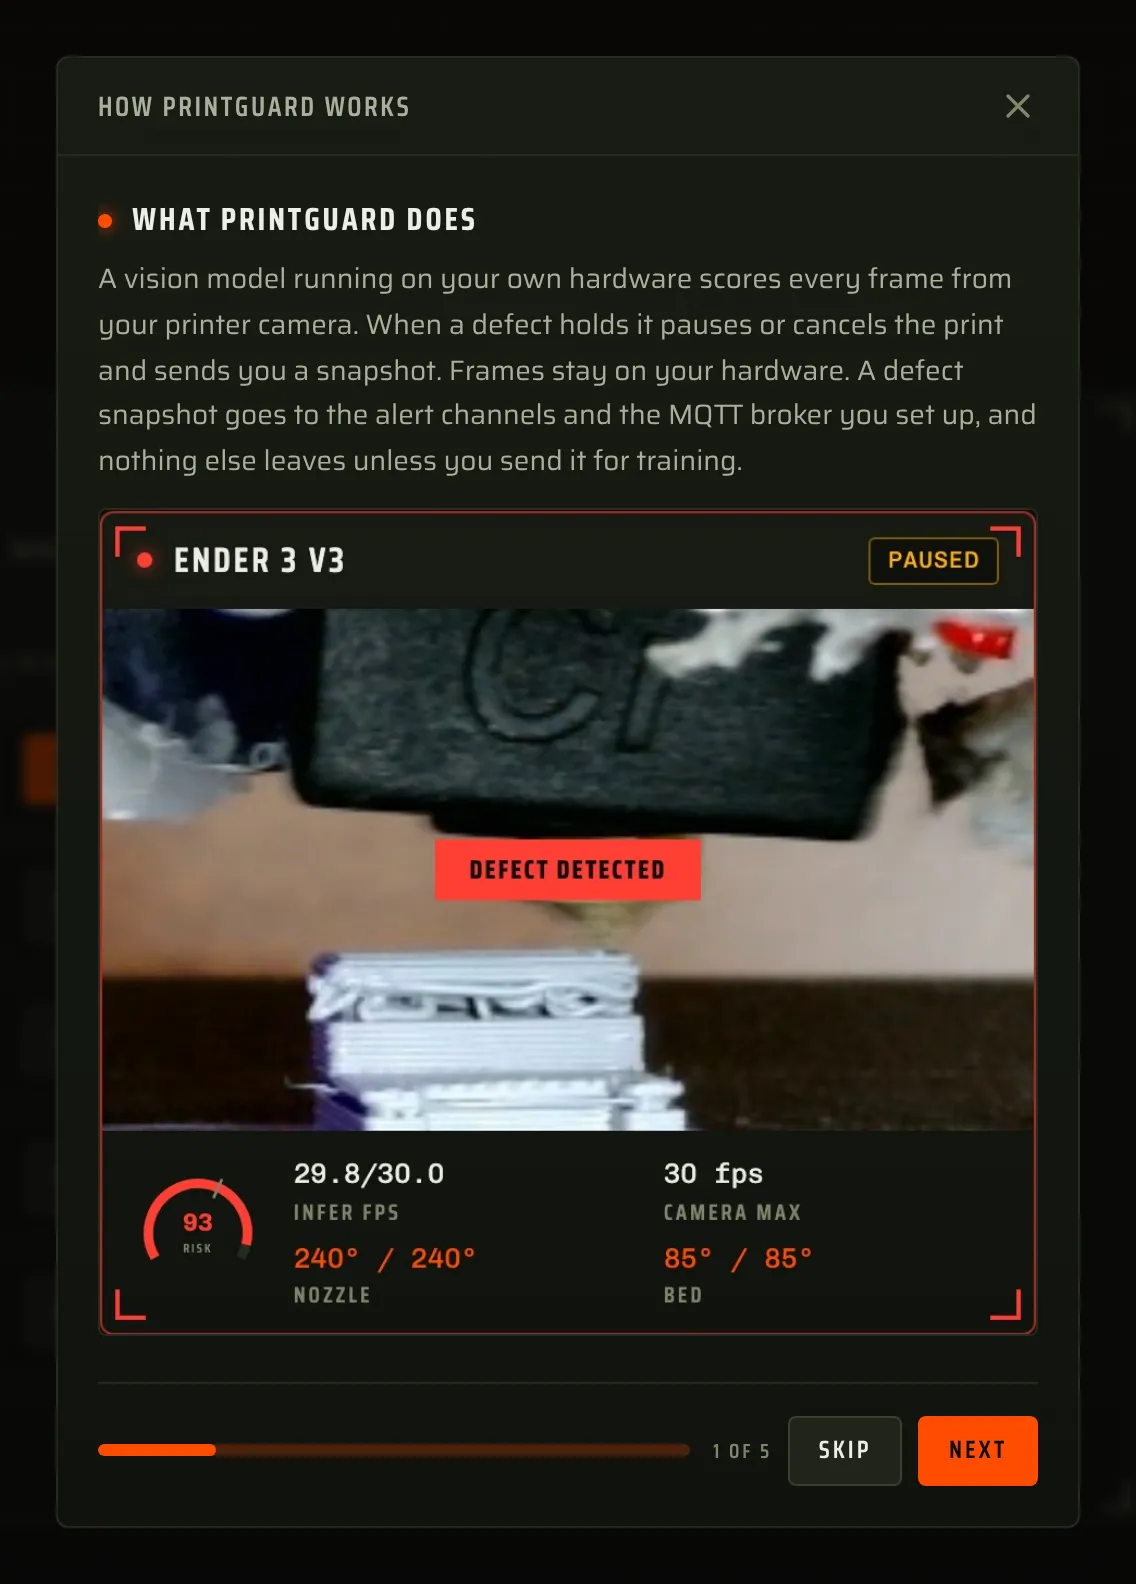
The help received from the community should not be understated here. Throughout many patch versions, users helped point out where the dashboard was confusing and unintuitive, which led to many of these changes. Some examples of this included how, when setting up connections to alert channels (i.e. Discord for notifications), the fields for the webhook URL and the channel ID had no explanation of what they were or how to find them. This helped demonstrate to me how, while some users may be familiar with these concepts, I should never expect a concept to be known by all users. For this example, in schemas for providers like Discord, I added a description to each field to explain what it is and how to find it. Other minor changes, like making non-userinput fields auto save, also removed issues where people just forgot to save their latest changes. These were minor adjustments but ones that made a big difference to the user experience.
Up to this point I had been developing on a desktop, tailoring the dashboard to my own screen and text size. People were pointing out to me how some features were obstructed on smaller screens and how there were major alignment issues when larger text sizes were used. At uni my studies were mainly focused on backend technologies leaving me with little experience in front-end development so I had to learn how to make the dashboard responsive and accessible. My research concluded that to aid in accessibility, the WCAG 2.2 AA standard should be followed, which is a set of guidelines for making web content more accessible to people with disabilities. AI was a massive help here, where many parallel agents could be sent off with their own browsers to test and analyse the dashboard for accessibility issues across many different dimensions and text sizes. The agents would then report back with their findings and autonomously fix the issues they could, with me reviewing their changes and fixing the ones they couldn't. I could not have developed the frontend without the help from AI due to my limited experience in this area, as it may have taken months for me to learn the necessary skills to make the dashboard accessible and responsive on my own.
What the hell is a container?: Improving the deployment experience
PrintGuard was now in a good place, with a usable demo in the browser and a functional hub with a deployable Docker image, but I still felt that I was isolating part of the printing community. Docker is a great tool for developers and allows for easy deployment across many platforms, however it is not a tool that the average hobbyist is familiar with, requiring the user to have Docker installed as a prerequisite. If I wanted to get rid of this barrier to entry I was going to need PrintGuard to come to the platforms the user was already familiar with, leading to the development of native Windows and macOS applications.
Still wanting to follow the modular and monolithic design principles where code should never be rewritten for different platforms, I discovered pywebview which allows you to create a native window for your Python application using the system's webview. This meant I could reuse the existing dashboard code, just requiring some platform specific code to handle the different quirks of both macOS and Windows when passing things like cameras to the engine for example. I realised that during inference the application would need to stay open in the background on users' machines, so I also added a system tray icon to allow users to close the window and keep the hub running from the tray using a cross platform library called pystray. Exporting the application to a native executable was done using PyInstaller which bundles the Python interpreter and all dependencies into a single executable for each platform.
This was not accomplished without some hiccups along the way. As my primary development environment is macOS, the majority of testing for the application left out Windows. When the executables were released, while I was confident that the mac app worked, I had no idea if the Windows app would. For about a month after the release of 2.3 I heard nothing from users so I assumed it was working fine, until I received an email reporting a major problem with the Windows application preventing it from opening. It turns out that the Windows executable was missing a dependency, which I had assumed was bundled by PyInstaller. Going back and forth with this user, they kindly tested fixes on their own machine and we eventually got it all up and working. If it wasn't for this user, I would have never known about the issue and the Windows app would have sat broken for everyone else. After this shock I explored ways of automating the testing of the Windows app, discovering that GitHub Actions had runners for different operating systems. I later added tests to the CI/CD pipeline to build the Windows and macOS app, start them on real machines and point them at a fake camera with a failing print to check that it catches it, before allowing a release to be merged.
Just a quick PSA, if anyone intends on building a macOS application without signing and notarising your applications, macOS will warn new installers that the app's from an 'unidentified developer' and opening it will require navigating through Privacy & Security settings to trust the application. This is a pain for users and I would recommend paying for an Apple Developer licence to avoid this, which I later did for PrintGuard.
There's no place like home: Customisation and plugins
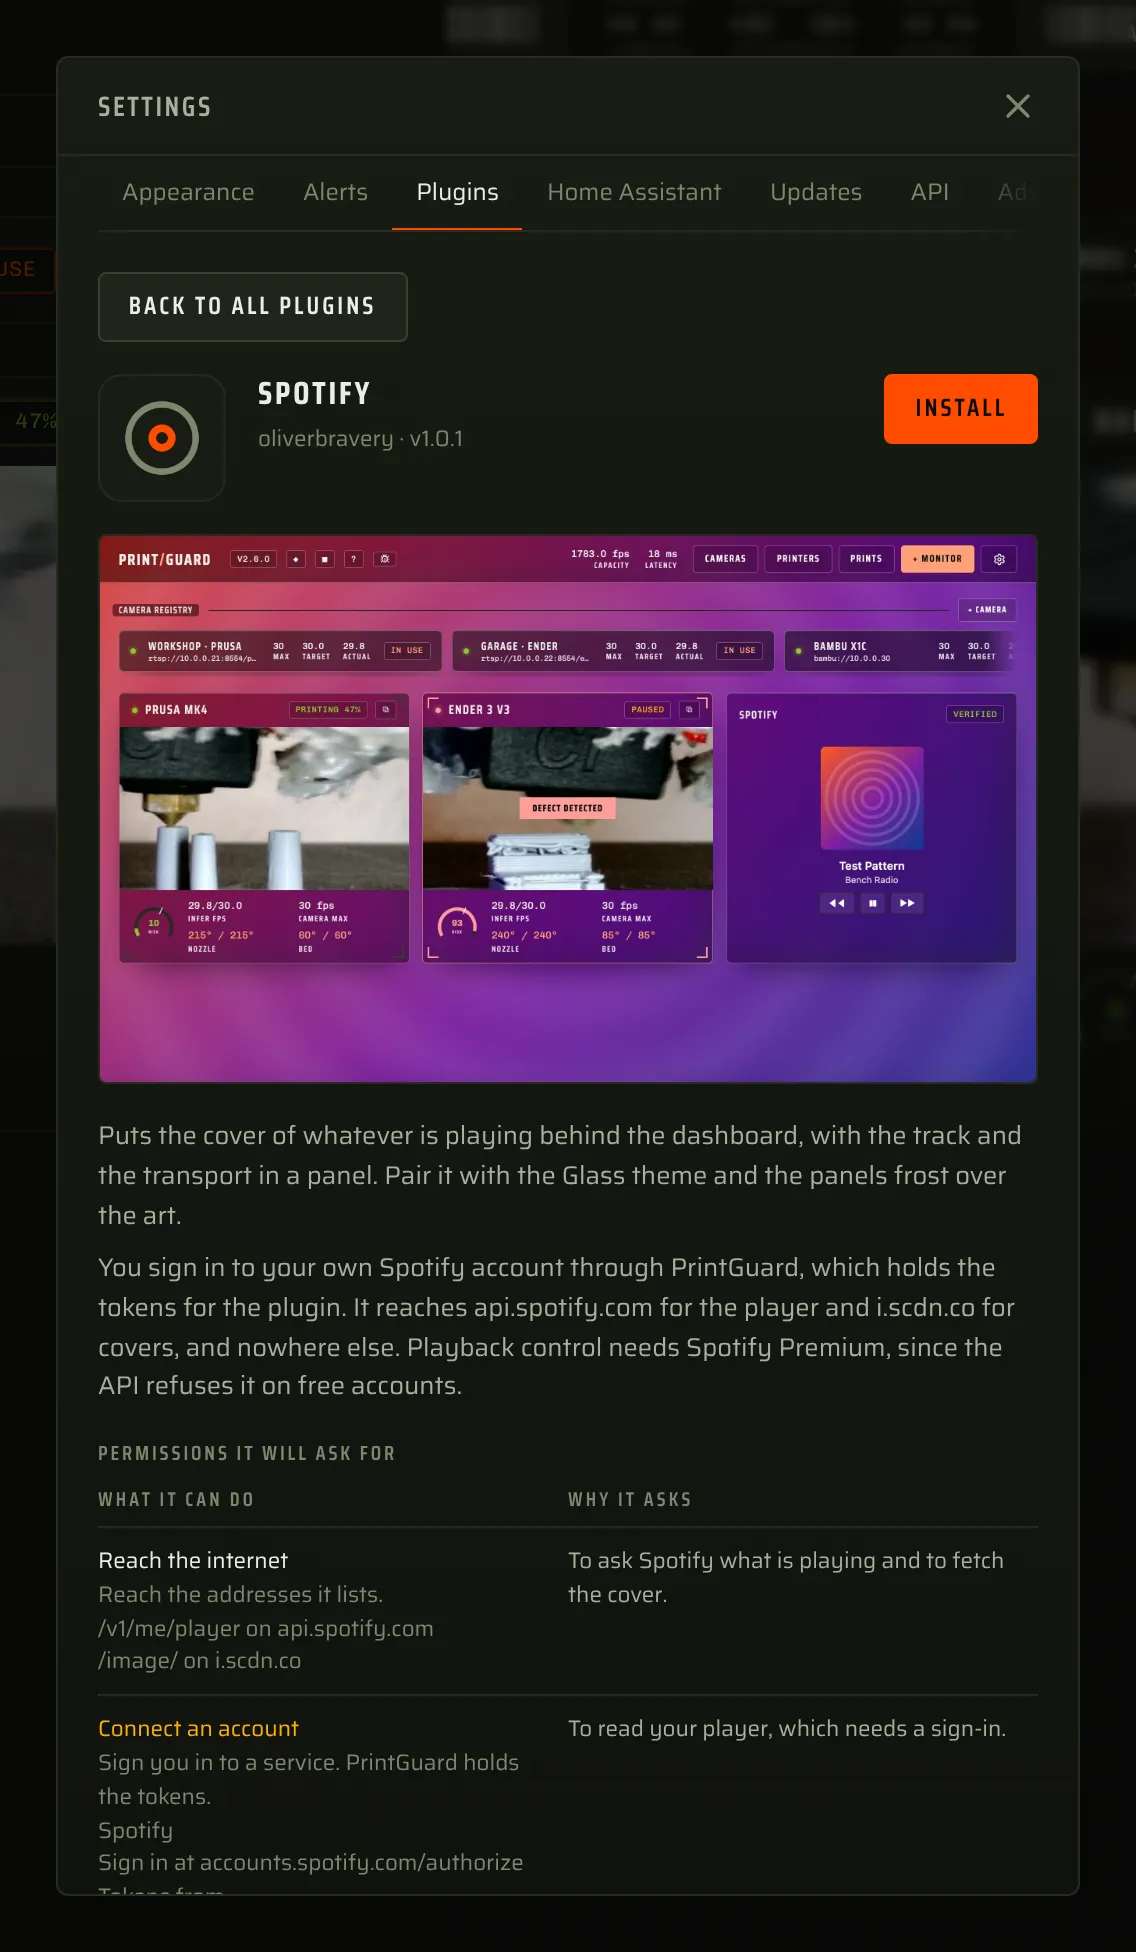
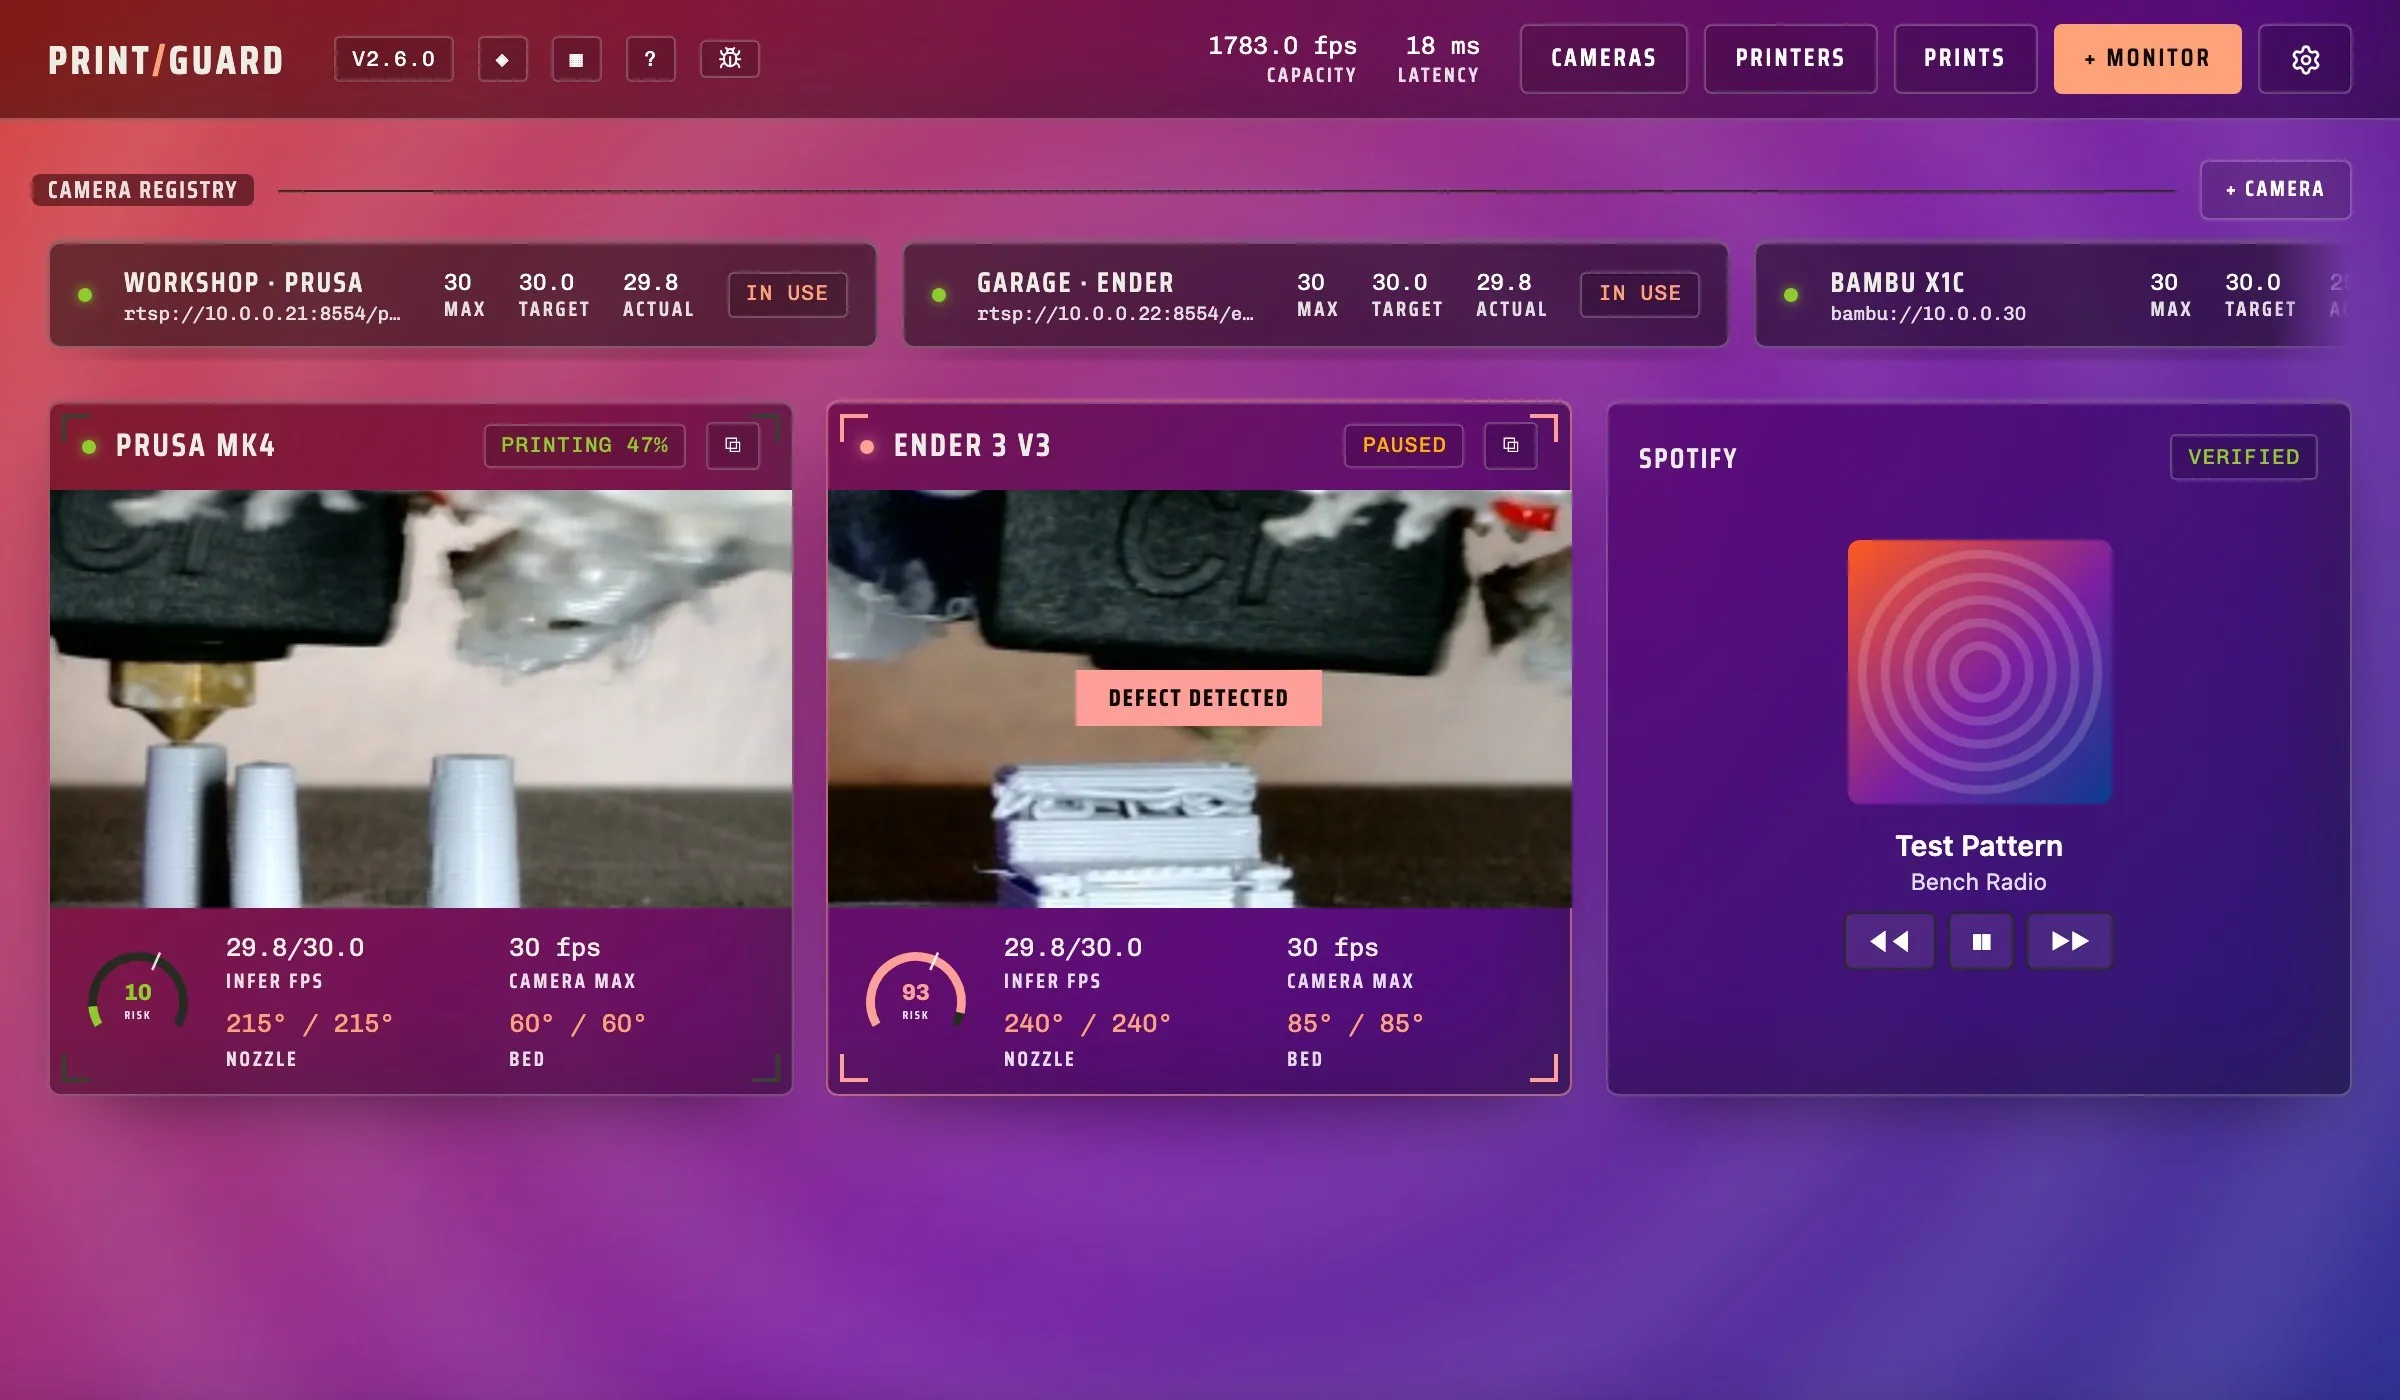
After the countless bugs triaged and with PrintGuard now in a stable state, I could finally focus on adding some fun, non-essential features. Some things I wanted to add included sound effects playable when defect alerts are triggered, intervaled print progress reports during prints sent through your alert channels and the ability to have the background image of the dash be the same as the album cover of your currently playing Spotify song. I wanted to add these features in a way that didn't bloat the core application, so I decided to create an external plugin system.
Not wanting plugins to be hardcoded into the main codebase, the philosophy was to allow users to import third party code, similar to Java mixins, to extend the functionality of PrintGuard. I created an interface for developers where certain parts of the codebase were exposed through a sort of internal API, allowing plugins to hook into the system and add their own functionality. Safety was a big concern here, as a malicious plugin could potentially access sensitive information or perform harmful actions. To mitigate this, all plugins run in a sandboxed environment with strict permission controls. The key points of this system are:
- The parts that run in the dashboard sit in locked-down iframes and the parts running on the hub use QuickJS compiled to WebAssembly. None of them can open a network connection of their own, and the hub parts have no filesystem.
- Plugins never see printer passwords, alert channel keys, MQTT logins or API tokens. They only get the states their permissions allow.
- They can't act directly either. They hand back a list of things they want done and PrintGuard checks each one against the permissions you granted.
- Plugins install switched off, and enabling one shows every permission with the author's reason for it. An update that asks for more waits for you to accept it.
- Catalogue plugins are pinned by hash to the commit I reviewed, so the code you install is the code I read and approved.
PrintGuard now ships with four approved plugins, including the sound effects, print progress and Spotify features I wanted, alongside a plugin adding PiP (Picture in Picture) support to the live camera view. The plugin system is still in its early stages, but I hope to see more plugins being developed by the community in the future.
How I used AI throughout this project: The AI disclaimer
Unsurprisingly in this day and age, AI was used to aid in PrintGuard's development, so I want to be clear about how. I designed the architecture, the monolithic engine and the modular contracts myself, writing agent instructions (i.e. CLAUDE.md files and prompts) that helped keep Claude to my spec. I also review all code produced, whether generated by an AI or proposed by contributors.
Claude Code is my main tool, used mostly to streamline research such as finding the gold standard approach for a technology I don't fully understand (i.e. MQTT support), how to build a watchdog you can rely on, and all other little things like this. When building features, AI helps me find examples, writes the parts that are well documented and goes through documentation for me. It's like having a research team and an implementation team, and it means one developer with a day job (such as myself) can get this done without taking months to learn new technologies.
I'm a backend developer, not a front-end developer. While PrintGuard's design, where things go, how the flows work and most of the user experience was designed by me, agents helped turn my ideas into code and handled the fiddly work of making it fit every screen and text size. I review the TypeScript, however most of the styling is AI-written.
Early October I found myself with a large portion of my weekly Claude Code Max subscription unused. Utilising the most capable models at the time (Fable 5.1 and Opus 5.5) at their highest reasoning efforts (sticking with X-high due to higher hallucination rates appearing when using maximum reasoning efforts) I had agents audit PrintGuard for bugs and security vulnerabilities. Burning an entire 20x Claude Max weekly usage window, the models successfully explored and triaged many high, medium and low priority issues, which after sweeping through them myself, I allowed the agents to fix, significantly improving the codebase. I found that the best way to use agentic systems was to have them review and fix the issues, then start a new session with a fresh context window and ask them to review the codebase again. Just like humans, LLMs still can't pick everything up on their first attempt which this helped to mitigate.
Where we're at now and what's next
As the amount of users utilising my model has expanded, I've realised that the model underperforms for certain printer types. This comes back to how little data was available when training the model for my dissertation. At the end of September someone suggested letting people send their own frames from their prints to help improve the model's accuracy, which later got implemented in version 2.6.0. I had never expected users would be willing to send me their print frames but turns out I was wrong.
It had to be anonymous, private, secure and cheap, since I'm paying for image storage out of pocket. The hub keeps a few frames from each print and when the print ends you can look through them, relabel any that are wrong and leave out any you don't want to send. This system is opt-in, so nothing is automatically sent to me. The frames go to a private Cloudflare R2 bucket in the EU through a small Worker anyone can audit. It only takes real JPEGs under 150 KB, never stores your IP address (it keeps a keyed hash for a day to enforce the limits) and keeps no logs. I download the frames, re-encode them so nothing but the pixels is left and delete them from the bucket, and anything I haven't collected is deleted after 30 days.
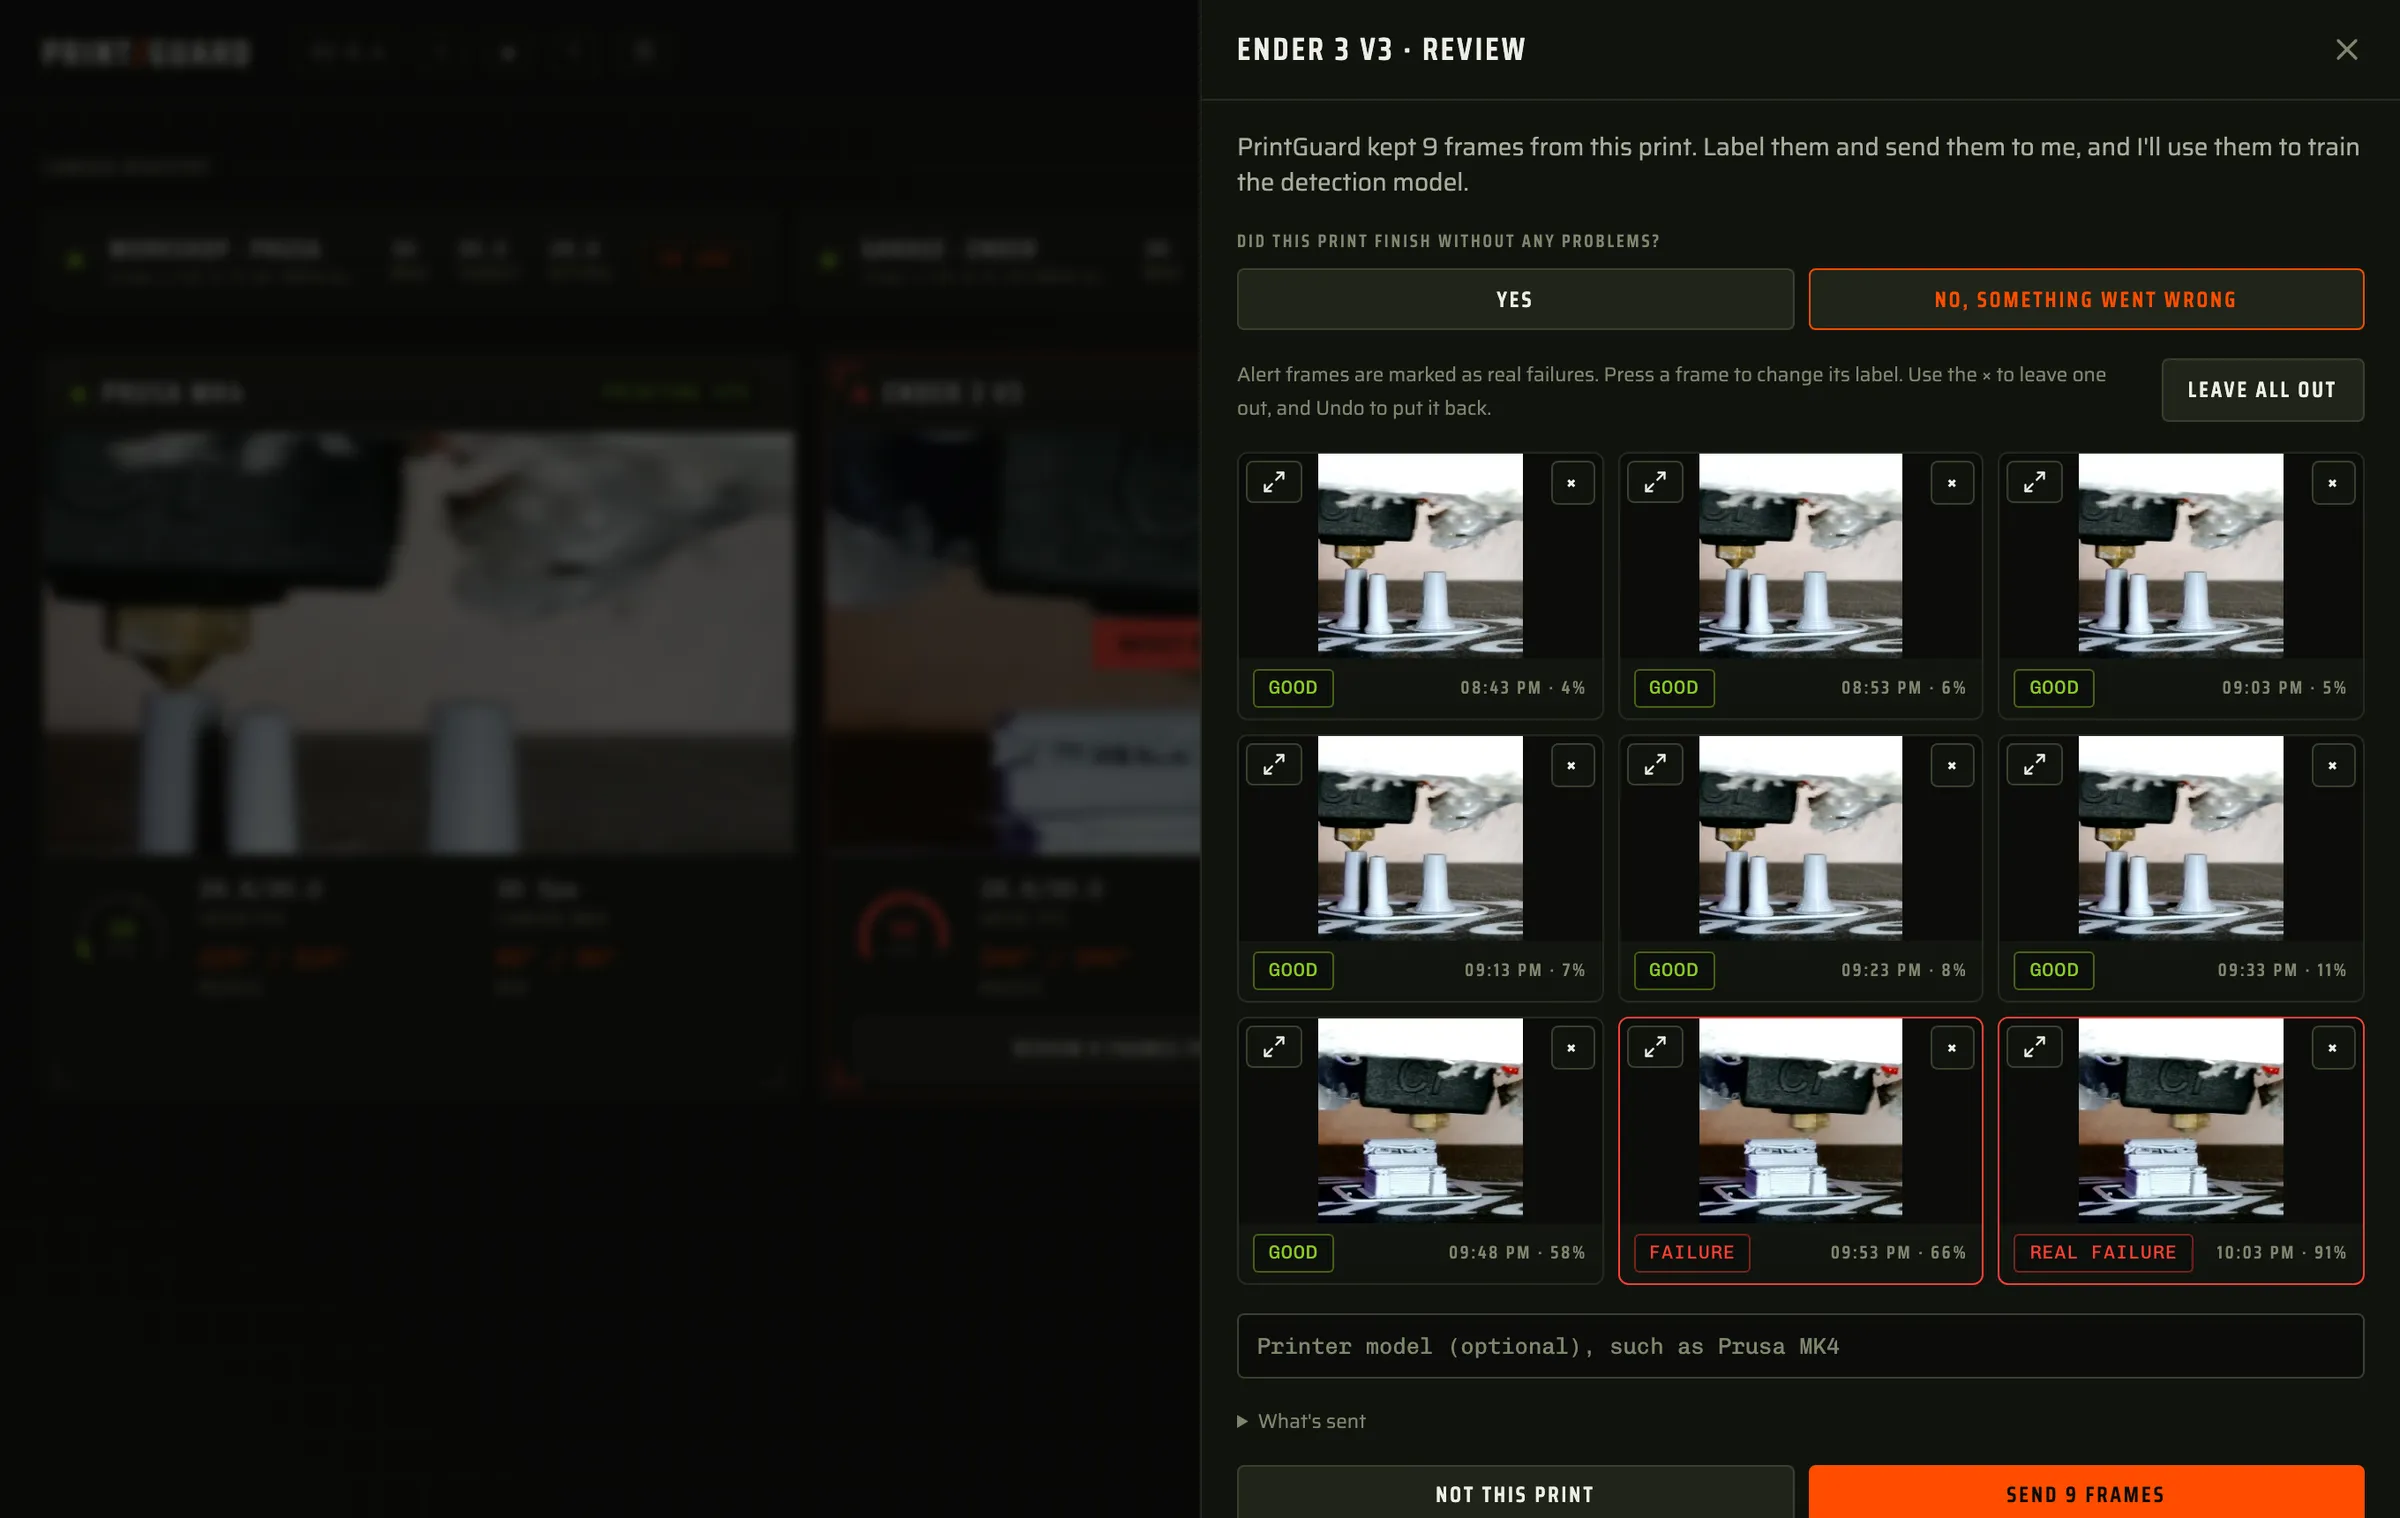
Since it went live, over 5,000 frames have been sent in, which is already about 136 MB of real prints on real printers. Once there's enough of them, the next big job is retraining the model with this new data so it gets better at the printers it currently struggles with.
If you run PrintGuard, I would really appreciate it if you could send me some frames. The more data I have, the better the model will be for everyone.
PrintGuard is on version 2.6.4 today. It runs in Docker or as a macOS/Windows app, works with OctoPrint, Klipper, Bambu Lab, Prusa and Elegoo printers, sending alerts through desktop notifications, ntfy, Pushover, Telegram and Discord, with a well documented API, MCP server and MQTT support. There have been 29 releases since 2.0, about 1,500 commits, around 1,000 Python tests and 220 browser tests. It has 367 stars, 35 forks, and 49 different people have opened issues, commented or sent pull requests. Of the 79 issues so far, 73 are closed.
If I started again I'd tell myself four things. Improve deployability before expanding features. Don't build what isn't your product, like tunnels and logins. Design around the core philosophy of the project like making PrintGuard fail safely instead of gracefully, because something that watches a printer and quietly stops watching is worse than nothing. And most importantly, listen to the people using it because most of what's good about PrintGuard came from the community.
PrintGuard is on GitHub so please feel free to check it out!